If you’re deploying a HANA DB module (HDI container) from SAP Business Application Studio (BAS) and your deploy fails with:
Error: Option parameter is not supported by the server; based on detected server version unknown
This usually means your deploy tool can’t “talk” to the HANA server properly, so it can’t detect the server version and then refuses to use certain deploy options.
The good news: the fix is simple.
What’s actually happening (in easy words)
Your DB deploy is done by a tool called @sap/hdi-deploy.
To connect to HANA and detect server features, @sap/hdi-deploy needs a database driver:
@sap/hana-client (official client) OR
hdb (Node.js driver)
If no driver is installed, the deployer can’t detect your HANA/HDI version, so it prints:
server.version = "unknown"
container-api-version = -1
hdi-version = -1
And then when your deploy includes an “option/parameter”, it fails with the message you saw.
Step 1: How to confirm the issue (get server.version = "unknown")
In BAS terminal, go to your db module folder and run:
cd db node node_modules/@sap/hdi-deploy/deploy.js –info all
If the issue exists, you’ll see something like:
server.version: “unknown”
container-api-version: “-1”
hdi-version: “-1”
That is the clear sign: deployer cannot connect and detect server capabilities.
Step 2: Fix it by installing a DB driver (recommended solutions)
Option A (Recommended): Install @sap/hana-client
This is the standard/default driver many setups use.
cd db npm i –save @sap/hana-client npm i
Now verify again:
node node_modules/@sap/hdi-deploy/deploy.js –info all
✅ After this, the server section should show a real version (not “unknown”).
Option B (Safe fallback): Install hdb and force deployer to use it
If you prefer the pure Node.js driver (or if your setup works better with it):
cd db npm i –save hdb npm i
Then run:
node node_modules/@sap/hdi-deploy/deploy.js –use-hdb–info all
✅ Now you should see a real server version and HDI versions.
Step 3: Clean reinstall (helps if BAS has messy node_modules)
If you installed the driver but still see “unknown”, do a clean reinstall:
cd db rm-rf node_modules package-lock.json npm install
Then rerun:
node node_modules/@sap/hdi-deploy/deploy.js –info all
Step 4: Deploy again
After the driver install + server version is visible, redeploy your project (MTA deploy / CF deploy / BAS deploy flow).
At this point, the error usually disappears immediately.
Extra Fix (Workaround): Remove --parameter from deploy command if present
Sometimes your deploy task/script contains something like --parameter ....
If the deployer can’t confirm server support, it blocks.
So if you see something like this in scripts or BAS tasks:
--parameter xyz=...
Try removing it and redeploy.
(But the real fix is still installing the driver, because “server unknown” is the main problem.)
Extra Check: Make sure BAS is actually bound to the HDI container
Your VCAP_SERVICES should show something like:
plan: "hdi-shared"
with schema, user, hdi_user
If that’s missing, the deployer may not have credentials to connect.
Quick checklist (copy-paste section)
✅ Run:
cd db node node_modules/@sap/hdi-deploy/deploy.js –info all
If you see server.version = unknown then:
✅ Install a driver:
Option A
npm i –save @sap/hana-client
Option B
npm i –save hdb
✅ Clean reinstall if needed:
rm-rf node_modules package-lock.json npm install
✅ Verify again:
node node_modules/@sap/hdi-deploy/deploy.js –info all
The article outlines best practices for writing effective ABAP Unit tests, emphasizing isolation, clarity, reliability, coverage, and maintainability. It also summarizes SAP guidance such as using the AAA pattern, self-contained tests, descriptive names, and test doubles instead of direct external dependencies.
It highlights common problems like duplicated setup, unclear assertions, hardcoded data, slow or unstable tests, and direct database access. A detailed checklist is provided to help developers review AUNIT tests for structure, assertions, isolation, coverage, execution, and automation.
Unit testing in ABAP, powered by ABAP Unit (AUNIT), is one of the most effective ways to ensure code quality, stability, and maintainability in SAP systems. However, writing a good test is just as important as writing the productive code itself. Poorly written tests can create fragility, slow down development, and even mislead developers.
This article consolidates best practices, common pitfalls, and SAP-recommended guidelines for writing effective ABAP Unit Tests. It also includes real-world observations from example implementations.
What Makes a Good ABAP Unit Test
A good unit test in ABAP should follow five core principles:
1. Isolation (Independent & Focused)
Single Responsibility: Test only one specific unit of code (method, class, or function module).
No External Dependencies: Avoid direct database, RFC, or GUI calls. Use test doubles (mocks, stubs, fakes) instead.
Independent Tests: Each test should run in isolation without depending on another test’s outcome.
2. Clarity (Readability & Understandability)
Descriptive Test Names: Use meaningful names, e.g., calculate_discount_with_valid_customer_returns_correct_value.
AAA Pattern (Arrange-Act-Assert):
Arrange: Set up the test environment (test data, mocks).
Minimal Comments: Favor self-documenting code over verbose comments.
3. Reliability (Repeatable & Consistent)
Deterministic: Always produce the same result for the same input.
Repeatable: Tests should run multiple times without random failures.
Fast Execution: Unit tests should run quickly to allow frequent execution.
4. Coverage (Comprehensive & Thorough)
Positive Scenarios: Verify correct behavior with valid inputs.
Negative Scenarios: Test for invalid or unexpected inputs.
Edge Cases: Validate unusual or boundary conditions.
Code Coverage: Strive for statement, branch, and path coverage to test all parts of the code.
5. Maintainability (Easy to Update & Refactor)
Resilient to Code Changes: Tests should not break with minor refactoring.
Reusable Fixtures: Use helper methods or test data builders to avoid duplication.
Refactor-Friendly: Structure tests for easy updates when production code evolves.
Observations from Real AUNIT Examples
From reviewing multiple AUNIT implementations, here are key takeaways:
Parameterized Input & Assertions: Instead of repeating literals, define constants or test parameters. This makes tests easier to maintain.
AAA Pattern Usage: Most examples followed Arrange-Act-Assert, but mixing setup logic with assertions makes tests harder to read.
Clear Assertions: Using cl_abap_unit_assert=>assert_equals with descriptive expected/actual variables improves readability.
Overuse of Test Data: In some tests, more data than required was created — this reduces clarity.
Mocking Missing: Many examples directly accessed database tables instead of using test doubles, which breaks isolation.
What Makes a Bad ABAP Unit Test
Bad tests can harm code quality instead of improving it. Common pitfalls include:
Structural Issues
Test Code Duplication: Repeated setup/assert logic instead of reusable fixtures.
Logic in Test Code: Using IF/CASE inside tests makes them unreadable and fragile.
Obscure Tests: Poorly named or unclear tests that don’t explain the intent.
Too Many Assertions: Each test should validate one condition; multiple assertions make debugging harder.
Too Long: Oversized test methods or classes that reduce readability.
Indirect Testing: Calling productive methods indirectly (via another object) instead of directly.
Hardcoded Test Data: Especially for calculations, without explaining the logic.
Behavioral Issues
Slow Tests: Due to database or external dependencies.
Unstable Tests: Flaky results due to external state (time, user, environment).
Dependent Tests: One test relies on another test’s execution or results.
SAP’s Recommendations for ABAP Unit Tests
According to SAP’s official guidance:
Keep tests independent of system state: Avoid real DB, RFC, or GUI calls; use mocks and local classes.
Follow AAA structure: Arrange test data, Act by calling the method, Assert results.
Self-contained: Every test must set up and clean up its own data.
One test, one assertion: Helps identify exactly what failed.
Readable and descriptive: Test names should clearly explain what’s being tested.
Automate execution: Tests should run automatically as part of CI/CD pipelines.
Aim for coverage but focus on value: Don’t chase 100% coverage blindly; test meaningful scenarios.
SAP ABAP AUnit Testing Checklist
This checklist is for developers reviewing ABAP AUnit tests. Each point specifies exact items to verify, with pass/fail criteria based on SAP guidelines and best practices.
Test Structure
Verify each test method uses AAA pattern: Confirm distinct sections for Arrange (data setup), Act (method call), Assert (verification); fail if sections overlap or are missing.
Check test method names follow methodName_scenario_expectedOutcome format (e.g., calculateDiscount_validInput_returns10Percent); fail if names are vague or non-descriptive.
Ensure each test method tests one logical condition only; fail if method exceeds 30 lines or includes multiple behaviors.
Confirm reusable fixtures (e.g., setup methods or helpers) are used for common data; fail if setup code is duplicated across tests.
Verify tests are self-contained: Each creates and cleans its own data; fail if reliant on external state or prior tests.
Check for no control structures (IF, CASE, loops) in test logic unless for minimal setup; fail if present in Act or Assert sections.
Test independence: Run tests in random order; fail if any order causes errors.
Assertions
Confirm one assertion (e.g., assert_equals) per test method; fail if multiple assertions exist.
Verify assertion uses descriptive variables (e.g., exp_result = 10, act_result = method_call()) and includes a failure message (e.g., msg = ‘Failed for input X’); fail if literals or no message.
Check inputs/outputs use variables or constants, not hard-coded literals; fail if literals are unexplained.
Ensure coverage of scenarios: At least one test each for positive (valid input succeeds), negative (invalid input fails), and edge cases (min/max/empty values); fail if any missing.
Verify minimal test data: Only necessary fields populated; fail if excess irrelevant data is created.
Isolation and Dependencies
Confirm unit under test has single responsibility; fail if test indirectly calls via other objects.
Check for test doubles (mocks/stubs/fakes) replacing DB, RFC, GUI, or external calls; fail if real accesses occur.
Verify no direct external interactions: Scan for SELECT, CALL FUNCTION, or GUI statements; fail if unmocked.
Ensure local test classes are defined within the tested object’s pool; fail if global or separate.
Coverage and Execution
Measure coverage: Use ADT tools to confirm ≥80% statement/branch/path coverage; fail if below or unmeasured.
Prioritize meaningful coverage: Identify untested paths; fail if critical scenarios (e.g., exceptions) are uncovered.
Test determinism: Run multiple times; fail if results vary due to time/environment.
Check execution speed: Each test <1 second; fail if slow due to unmocked dependencies.
Verify refactoring resilience: Simulate minor code changes; fail if tests break without behavior change.
General Principles
Ensure self-documenting code: Names explain intent; fail if comments needed for basic understanding.
Confirm CI/CD integration: Tests runnable in pipelines; fail if not automated.
Verify no parameters in test methods: Adhere to AUnit standard; fail if inputs/outputs present.
Execution frequency: Confirm tests run via ADT (Ctrl+Shift+F10); fail if not integrated into workflow.
Conclusion
ABAP Unit Testing (AUNIT) is not just about writing tests — it’s about writing valuable, maintainable, and meaningful tests that improve software quality.
Good AUNIT follows isolation, clarity, reliability, coverage, and maintainability. Bad AUNIT introduces duplication, complexity, dependencies, or instability.
By adhering to SAP’s best practices and avoiding common pitfalls, development teams can ensure their ABAP code remains robust, future-proof, and easy to maintain.
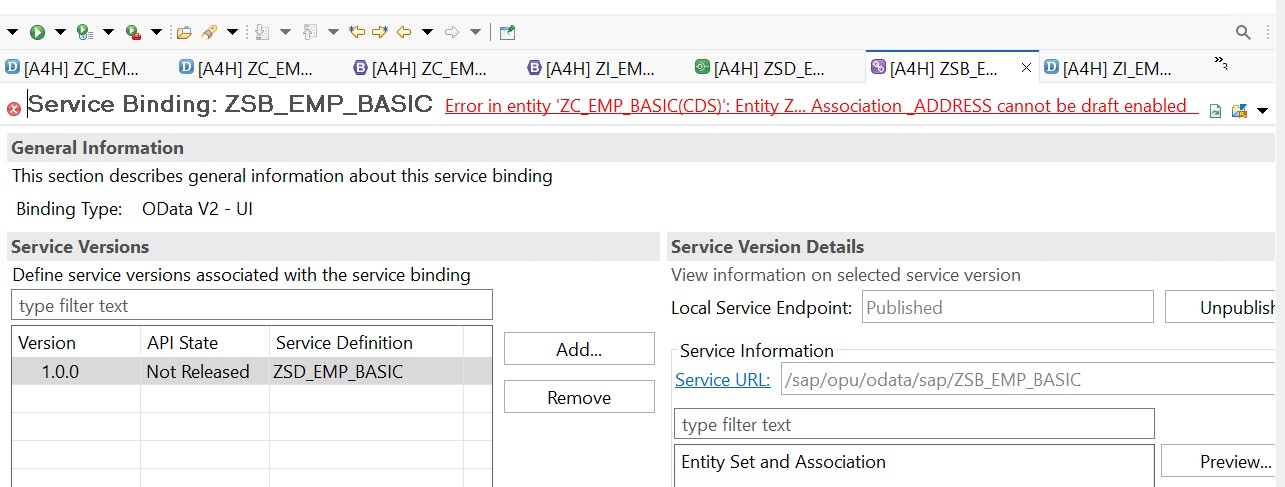
Step 01: Start from your Behaviour Definition [both consumption/projection view as well as I view] and check if the draft is enabled everywhere as required.
Step 02: If you have enabled draft at every association level using {with draft;} and still not able to fix it, then visit each CDS file linked with the Behaviour definition and try to hove over all the yellow underlines and fix them [by clicking right click and choosing “Quick Fix”]
Step 03: Also, check if you have missed adding etag master at the association level behaviour definition.
Step 04: Try to change the cardinality from [0..*] to [0..1] and then try to activate the Service Binding again.
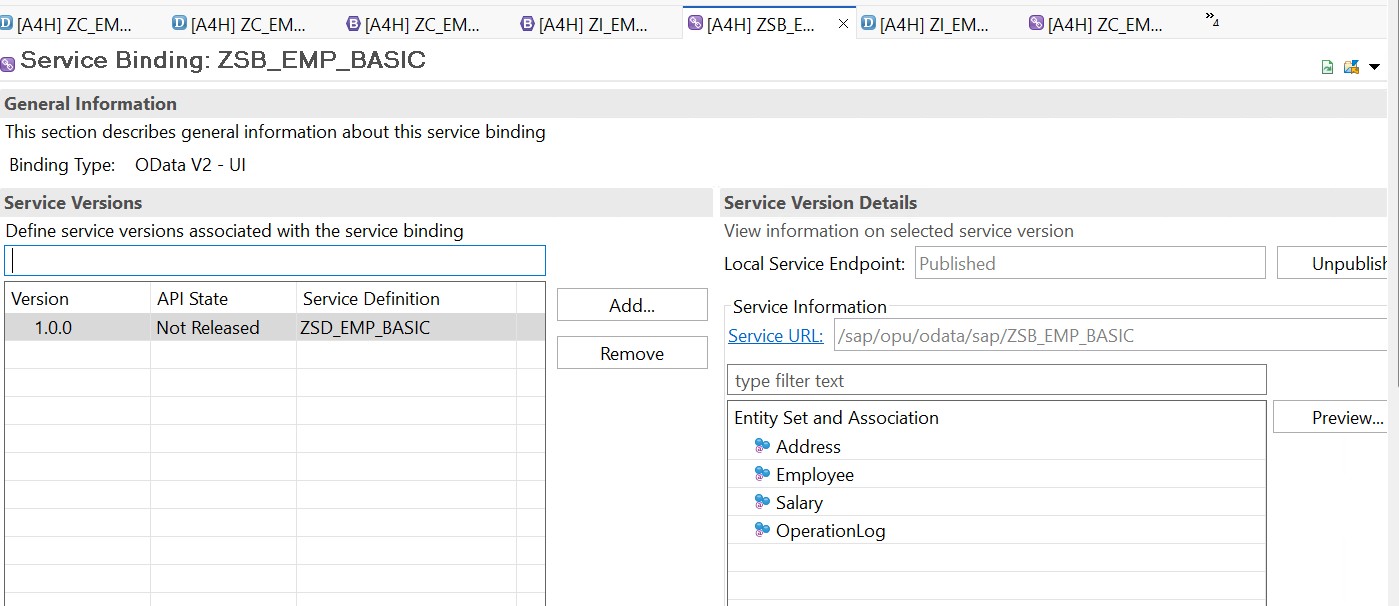
If the above steps are fine, and you try to refresh the screen and activate the screen, you will see the success screen as below:
Check out our in-depth guide to ABAP Core Data Services (CDS) for SAP HANA. This PDF walks you through CDS basics, syntax, annotations, and more advanced stuff like RAP integration, performance tweaks, and even machine learning examples. It’s great for SAP developers and architects, packed with real-world examples, easy-to-follow tutorials, and hands-on exercises to help you build SAP Fiori apps, run analytical queries, or create cloud-ready solutions. Grab it now from gocoding.org to level up your SAP skills and make data modeling with CDS a breeze.
Welcome to the innovative solution for finding electric vehicle (EV) charging stations. An electric vehicle will be the only vehicle everyone will be driving in the future. In that case, every driver will search for a nearby EV charging station. Therefore through this article, we will build a simple iframe based EV charging station finder or locater using SAP UI5.
This user-friendly application utilizes the power of SAP UI5 technology to provide a seamless and efficient way for EV owners to locate charging stations near their location. With up-to-date information on the availability and status of charging stations, you can easily plan your trips and ensure that you always have access to a charging point when needed. Get started now and discover the convenience of finding your next charging station with just a few clicks!
Methods To Build EV Charging Station Finder Or Locater Using SAP UI5
We can build our locator app in multiple ways, three among them are:
1. Using Google Maps: Here, we will showcase what is already over Google Maps via Google Maps API Integration.
2. Using Manual Entry: Here, we will have to gather data, create Map either via SAP Maps or Google Maps and plot our manually added data on top of the map.
3. Embedding multiple maps from different sources: Here, we will reuse the maps already created by different 3rd party and Government portals.
In this project, we will explain the 3rd way of creating an EV Charging Station finder or locator using SAP UI5.
sap.ui.define([

"sap/ui/core/mvc/Controller"

], function (Controller) {

"use strict";

return Controller.extend("EVMap.EVMap.controller.Map", {

onSelectUSA: function (oEvent) {

this.getView().byId("pageContainer").to(this.getView().byId("pageUSA"));

},

onSelectEU: function (oEvent) {

this.getView().byId("pageContainer").to(this.getView().byId("pageEU"));

},

onSelectIndia: function (oEvent) {

this.getView().byId("pageContainer").to(this.getView().byId("pageIndia"));

}

});

});
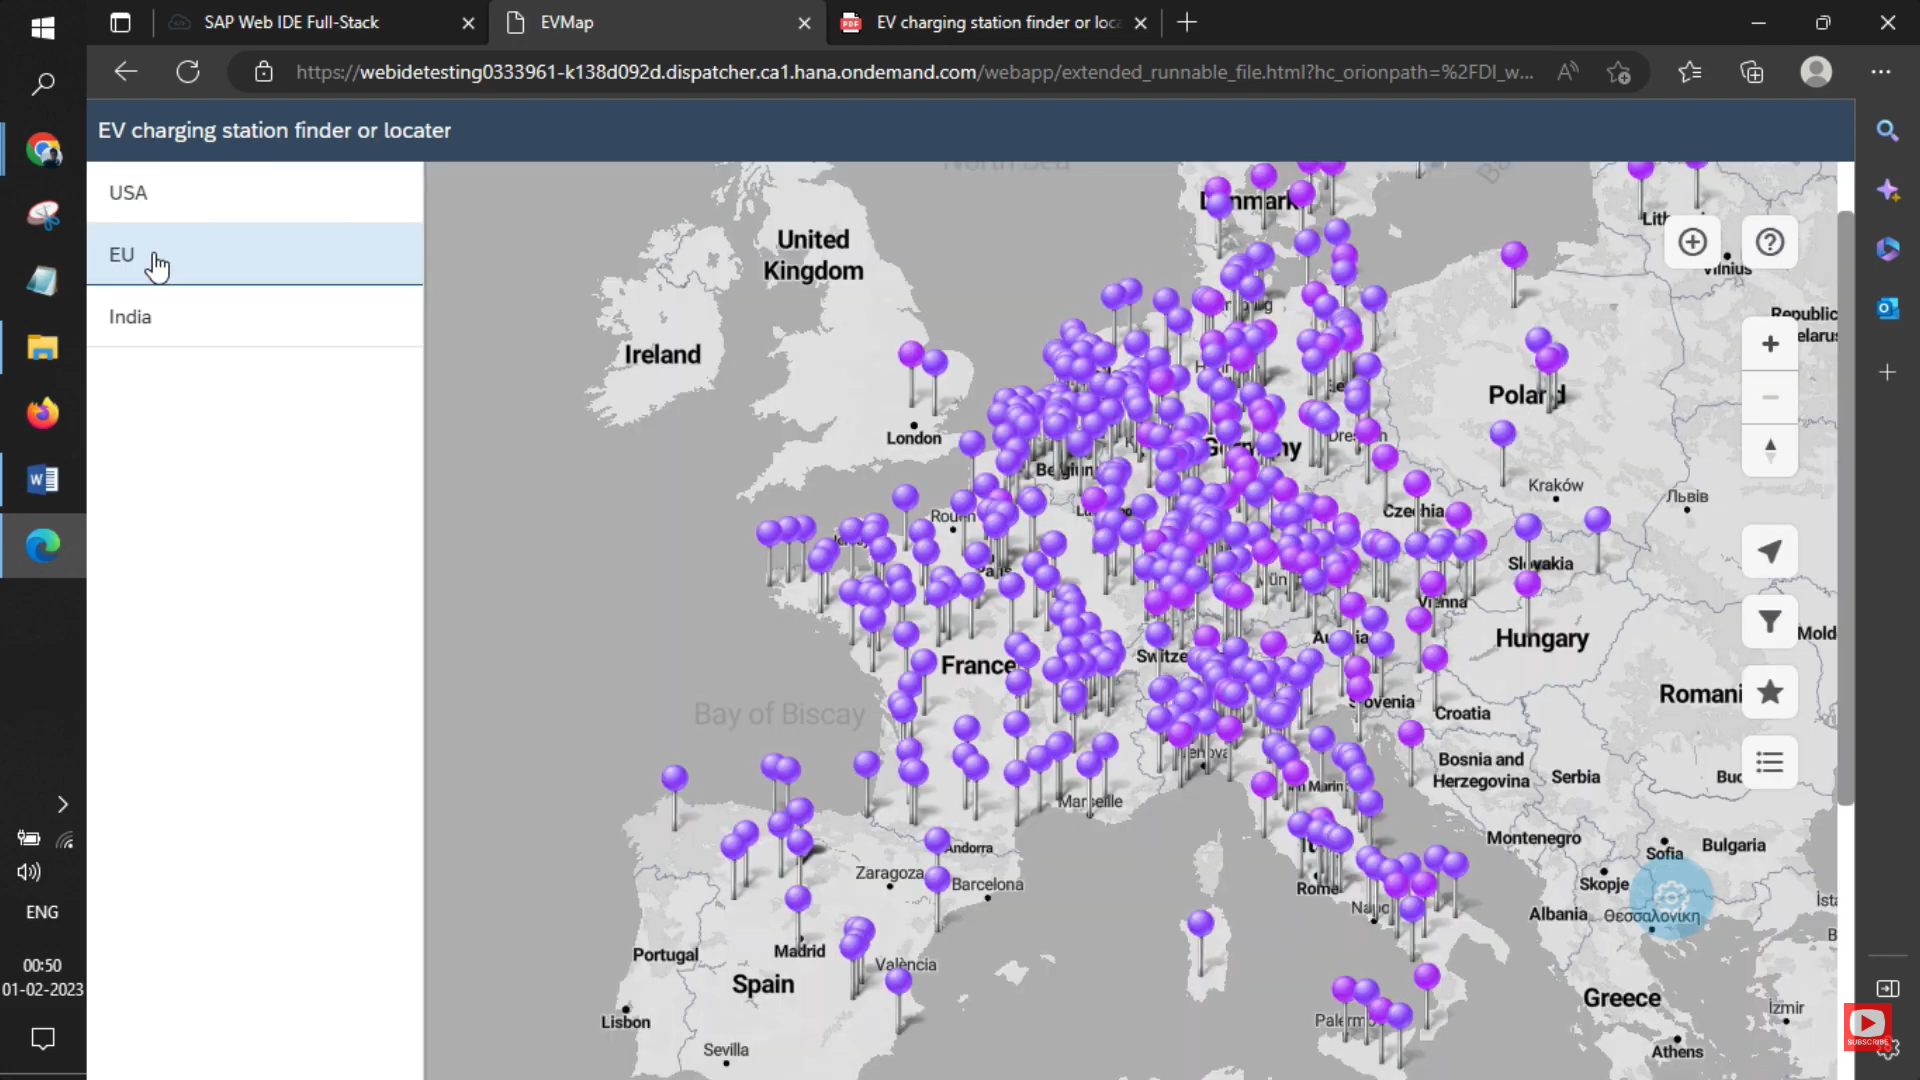
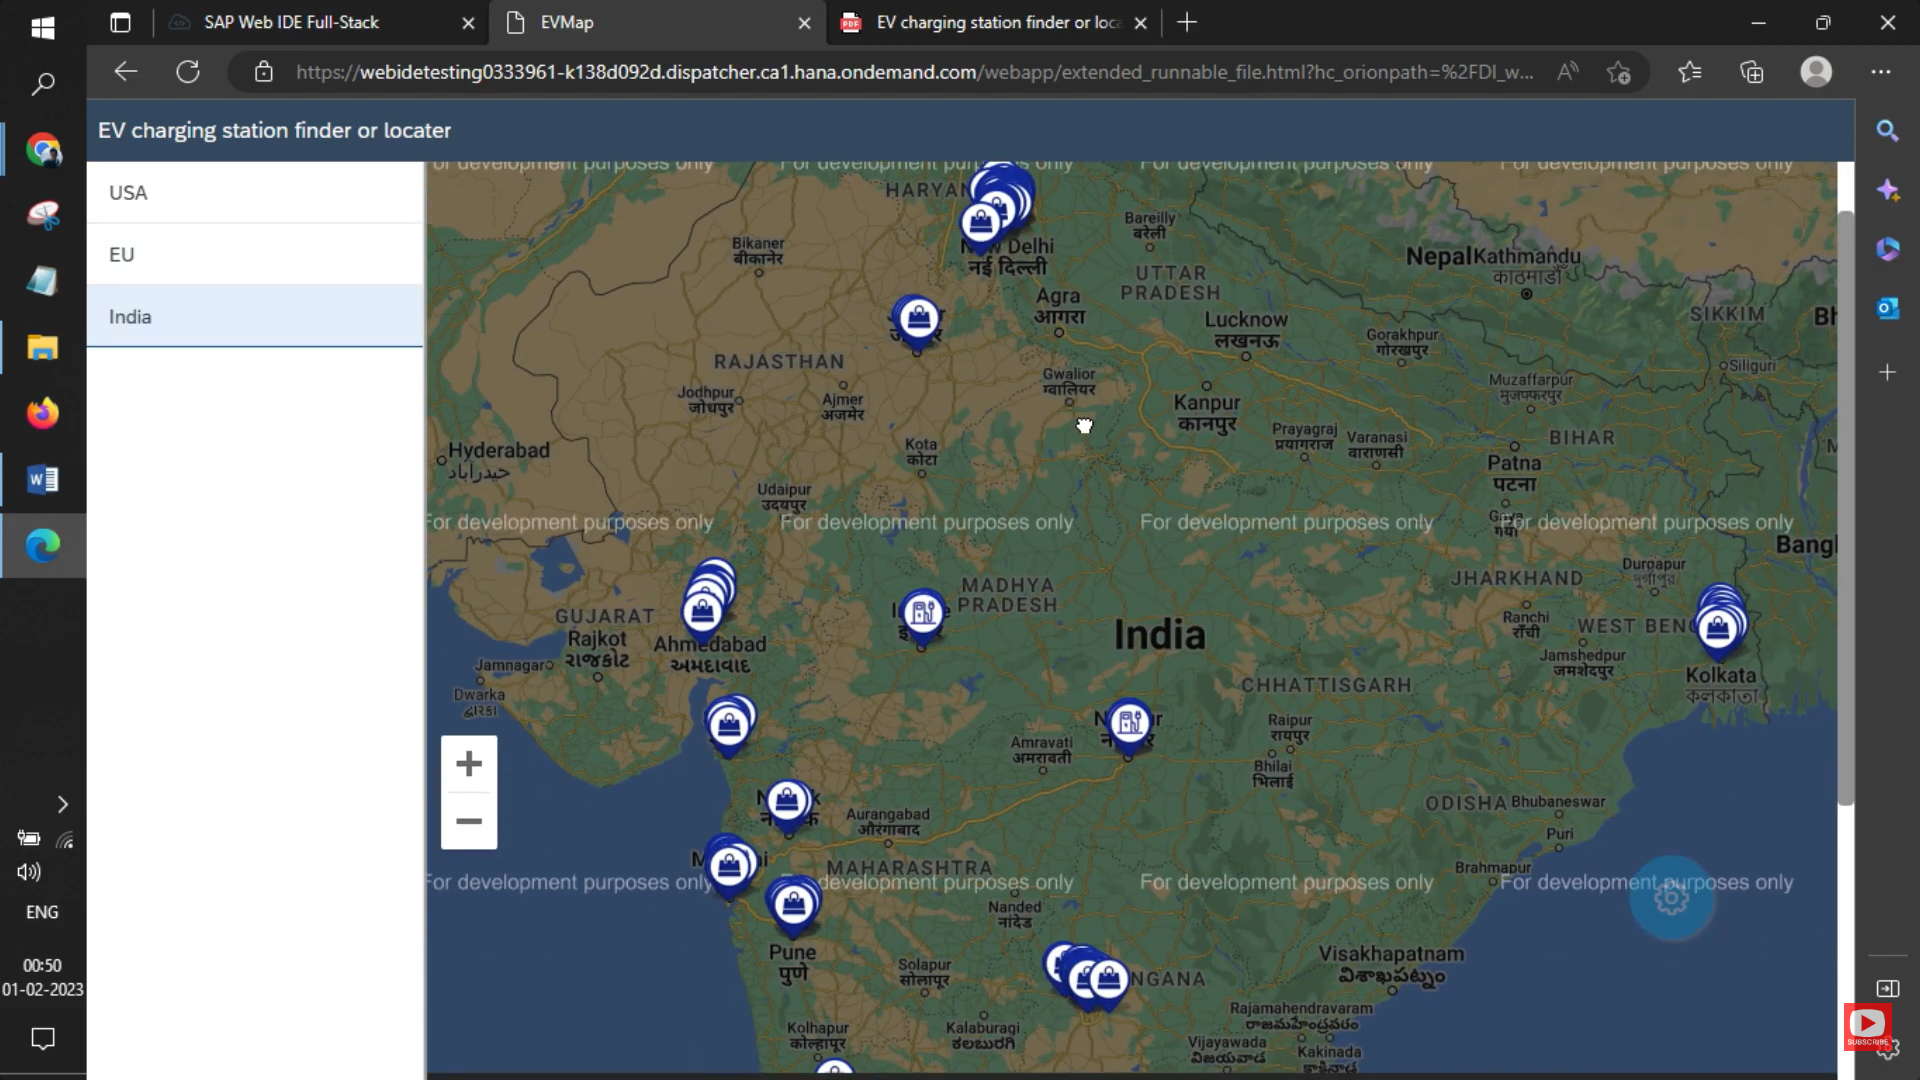
Output
We have successfully built this EV Charging Station Finder or Locater Using SAP UI5. You will get the following output as shown below.
USA
European Union (EU)
India
Key Points To Remember
We have just demonstrated a simple project for your understanding. You can improve the UI/UX and other functionalities of this application. Here are some key points to keep in mind while building an EV Charging Station Finder using SAP UI5:
User Experience: Ensure that the application is user-friendly, intuitive, and easy to navigate. This will help users find charging stations quickly and efficiently.
Data Accuracy: The application should use accurate and up-to-date data on the availability and status of charging stations. This will help users plan their trips and avoid wasting time at non-functional charging stations.
Integration with Maps: Integrating the application with a mapping service, such as Google Maps, can provide users with a visual representation of the location of charging stations. This will help users easily find their desired charging station.
Real-Time Availability: The application should have real-time information on the availability of charging stations so that users can check for the current status of a charging station before reaching it.
Responsiveness: The application should be responsive, meaning it should adjust to different screen sizes and work seamlessly on different devices such as smartphones, tablets, and desktops.
Security: Ensure that the user data and payment information are secure and protected from potential cyber threats.
Performance: The application should be fast, efficient, and scalable to handle large amounts of data and traffic.
By keeping these key points in mind, you can build an effective and user-friendly EV Charging Station Finder using SAP UI5.
Improve your data collection and insights with Qualtrics Surveys integration in SAP UI5 or your website. Our seamless integration makes it easy to add powerful surveys to your platform, allowing you to gather valuable feedback and insights from your users. With Qualtrics, you can get a comprehensive understanding of customer satisfaction, market trends, and much more.
Requirements
The following are the prerequisites to perform Qualtrics integration in SAP UI5 or any website:
Qualtrics Account: To integrate Qualtrics surveys into your UI5 or website, you must have a Qualtrics account.
Access to UI5 or Website Code: To integrate Qualtrics into your UI5 or website, you must have access to the code for your platform.
Familiarity With Qualtrics API: A basic understanding of Qualtrics API is required to perform the integration.
Basic Knowledge of HTML, CSS, and JavaScript: You should have a basic understanding of these technologies to integrate Qualtrics into your UI5 or website.
Development Environment: You will need a development environment to test the integration before deploying it to your production environment.
Different Types of Qualtrics Integration
There are several types of Qualtrics integration, including:
1. Embedded Surveys: Qualtrics surveys can be embedded directly into a website or application using an iFrame or JavaScript code.
2. REST API Integration: The Qualtrics REST API allows developers to integrate Qualtrics surveys and data into their own systems and applications.
3. Webhooks Integration: Webhooks can be used to trigger events in other systems based on specific actions taken in Qualtrics.
4. Single Sign-On (SSO) Integration: Qualtrics supports SSO integration to allow users to log into Qualtrics using their existing credentials.
5. Zapier Integration: Zapier is a platform that enables integration with other applications and services. Qualtrics can be integrated with Zapier to automate workflows and data transfer between applications.
6. Salesforce Integration: Qualtrics integrates with Salesforce to allow users to collect and analyze customer feedback data directly within Salesforce.
7. Marketing Automation Integration: Qualtrics integrates with several marketing automation platforms to provide a unified view of customer data and insights.
These are just a few examples of the different types of Qualtrics integration available. The specific type of integration you choose will depend on your specific needs and requirements.
2. Click on the “Create Survey / Project” button to start a new survey.
3. Choose a survey type and select a template, or start from scratch.
4. Customize your survey by adding questions, formatting, and branding.
5. Preview the survey to make sure it looks and functions as you intended.
6. Set up email invitations and reminders for respondents.
7. Choose a method for distributing the survey, such as sending an email or embedding the survey on a website.
8. Launch the survey and start collecting responses.
9. Analyze the data and review the results of your survey.
10. Use the insights gathered from the survey to make informed decisions and improve your business processes.
These steps provide a general overview of the process of creating a survey on Qualtrics. The specific details and options available will depend on your Qualtrics account and the type of survey you are creating.
Steps To Integrate Qualtrics in SAP UI5 Using iframe
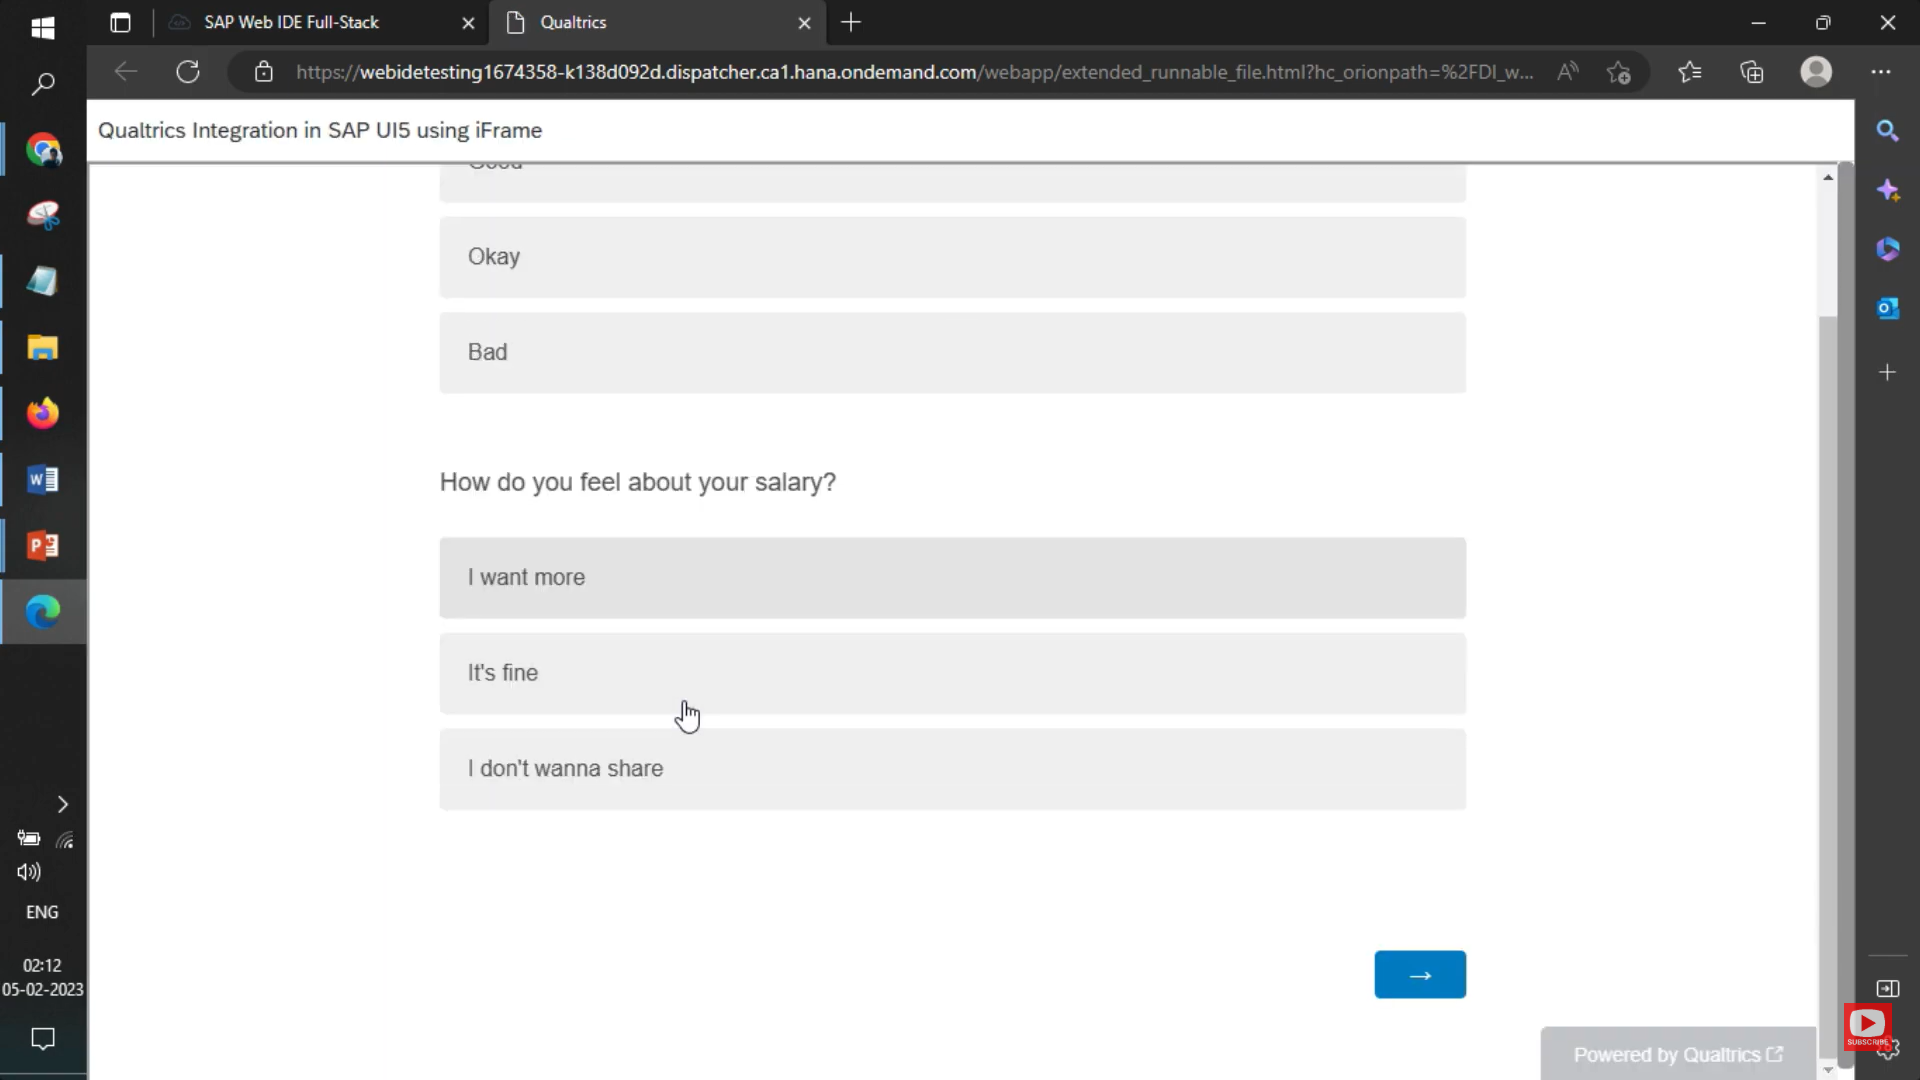
Here are the steps for Qualtrics surveys integration In SAP UI5 using an iFrame:
1. Create a Qualtrics survey and obtain the embed code.
2. In the UI5 application, create an iFrame in the HTML file of the view.
3. Set the source of the iFrame to the Qualtrics survey URL obtained from the embed code.
4. Adjust the size of the iFrame to match the desired size of the survey in the UI5 application.
5. Save and run the UI5 application to see the Qualtrics survey integrated with the iFrame.
Note: Make sure to configure the Qualtrics survey to be accessible from the UI5 application. Additionally, be aware of the security considerations when using iFrames in your application.
With Qualtrics Surveys Integration in SAP UI5, organizations can streamline their survey process and gather real-time data, providing them with the necessary information to make informed decisions and improve their overall operations. Enhance your data collection efforts today and get ready to unlock the full potential of your data and take your business to the next level with our Qualtrics integration.
Are you looking to enhance your SAP UI5 experience with the power of data-driven decision-making? Look no further! We will provide you with the solution by teaching you how to integrate Qualtrics Surveys in SAP UI5 using JavaScript. With this integration, you can easily collect, manage and analyze survey data without requiring manual data entry.
Qualtrics is a leading survey software that provides a comprehensive platform for creating, distributing, and analyzing surveys. SAP UI5, on the other hand, is a user-friendly and versatile platform for building web applications. By combining these two technologies, you can streamline your survey management process, get access to valuable insights and make informed decisions.
Whether you’re looking to conduct market research, collect customer feedback, or gather employee opinions, integrating Qualtrics Surveys in SAP UI5 using JavaScript will help you achieve your goals. Get started now and experience the benefits of a seamless, data-driven process!”
Requirements
To integrate Qualtrics Surveys in SAP UI5 using JavaScript, you will need the following:
1. An active Qualtrics account
2. SAP UI5 development environment (e.g., SAP Web IDE)
3. Basic knowledge of JavaScript
4. Understanding of REST APIs and web services
5. Familiarity with SAP UI5 development concepts and architecture
6. Access to Qualtrics API Key and Survey ID
7. A web browser to test the integration
Note: Some specific requirements may vary depending on your organization’s setup and the specific use case for the integration.
What Are The Different Types of Qualtrics Integration?
Qualtrics provides several types of integrations to help organizations seamlessly integrate their survey data into their existing systems and workflows. Some of the common types of Qualtrics integrations include:
1. API Integration: A programmatic way to access and manipulate survey data, automate workflows, and integrate with other systems.
2. Webhooks Integration: A way to trigger actions in other systems based on specific survey events, such as a respondent submitting a survey.
3. Embed Integration: A way to embed Qualtrics surveys into websites or applications using iFrame or JavaScript.
4. Zapier Integration: A way to connect Qualtrics with over 2,000 other web applications using Zapier.
5. Salesforce Integration: A way to integrate Qualtrics survey data with Salesforce to improve customer insights, support, and engagement.
6. Marketo Integration: A way to integrate Qualtrics survey data with Marketo to enhance marketing automation and customer engagement.
These are just some of the common types of Qualtrics integrations. Depending on your organization’s needs and goals, there may be other integrations that are more relevant for you.
Step 2: Click on the “Create Survey/Project” button. This will start a new survey.
Step 3: Choose the survey type and select a template, or you can start from scratch.
Step 4: Customize your survey by adding questions as per your requirements. And also do formatting and branding.
Step 5: Preview the survey to make sure it looks and functions as you intended.
Step 6: Set up email invitations and reminders for respondents.
Step 7: Choose a method to distribute the survey, such as sending an email or embedding the survey on a website.
Step 8: Launch the survey and start collecting responses.
Step 9: Analyze the data and review the results of your survey.
Step 10: Use the insights that you gathered from the survey to make calculative decisions and improve your business processes.
These steps are just a general overview of the process of how to create a survey on Qualtrics. The specific details and options available will depend on your use cases, such as your Qualtrics account and the type of survey you will create.
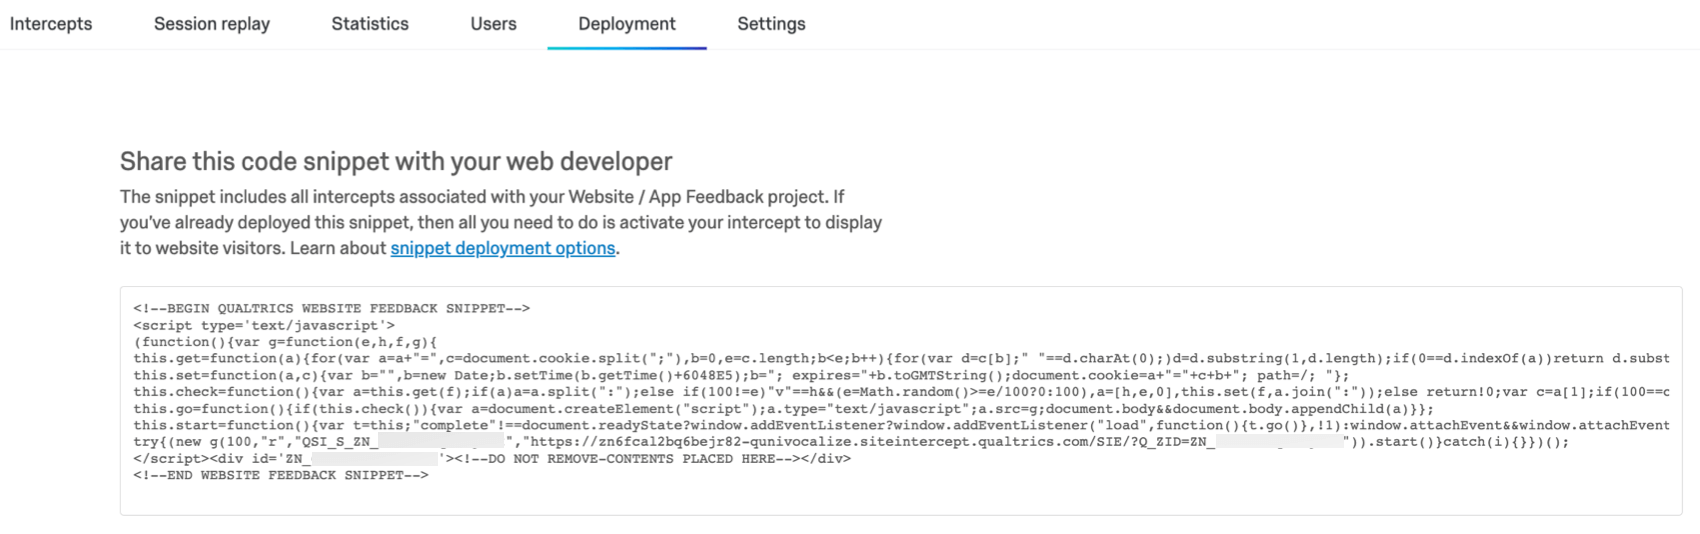
Getting The Code Snippet From Qualtrics
To get the code snippet, you need to upgrade your account, as it is not supported in a free account. This snippet will be used for both script-based and plugin-based integration. To get the code snippet, visit settings and then click on deployment, as shown below:
Now, you can code this snippet and use the same in UI5:
Steps To Integrate Qualtrics In SAP UI5 using JavaScript Snippet
Step 1: Create a Qualtrics survey and obtain the snippet code.
Step 2: In the UI5 application, add the snippet in controller init (or any other function that you can trigger as per your requirement.
Step 3: Save and run the UI5 application to see the Qualtrics survey integrated as a sidebar.
Note: Remember to configure the Qualtrics survey so that it is accessible from the UI5 application. Additionally, be aware of the security considerations when using snippets in your application.
Source Code
Qualtrics.view.xml
<mvc:View controllerName="Qualtrics.Qualtrics.controller.Qualtrics" xmlns:mvc="sap.ui.core.mvc" displayBlock="true" xmlns="sap.m"

xmlns:html="http://www.w3.org/1999/xhtml">

<Shell id="shell">

<App id="app">

<pages>

<Page id="page" title="Qualtrics Integration in SAP UI5 using JS Code">

<content>

</content>

</Page>

</pages>

</App>

</Shell>

</mvc:View>
Qualtrics.controller.js
sap.ui.define([

"sap/ui/core/mvc/Controller"

], function (Controller) {

"use strict";

return Controller.extend("Qualtrics.Qualtrics.controller.Qualtrics", {

onInit: function () {

var snippet =

'var g=function(e,h,f,g){this.get=function(a){for(var a=a+"=",c=document.cookie.split(";"),b=0,e=c.length;b<e;b++){for(var d=c[b];" "==d.charAt(0);)d=d.substring(1,d.length);if(0==d.indexOf(a))return d.substring(a.length,d.length)}return null};this.set=function(a,c){var b="",b=new Date;b.setTime(b.getTime()+6048E5);b="; expires="+b.toGMTString();document.cookie=a+"="+c+b+"; path=/; "};this.check=function(){var a=this.get(f);if(a)a=a.split(":");else if(100!=e)"v"==h&&(e=Math.random()>=e/100?0:100),a=[h,e,0],this.set(f,a.join(":"));else return!0;var c=a[1];if(100==c)return!0;switch(a[0]){case "v":return!1;case "r":return c=a[2]%Math.floor(100/c),a[2]++,this.set(f,a.join(":")),!c}return!0};this.go=function(){if(this.check()){var a=document.createElement("script");a.type="text/javascript";a.src=g;document.body&&document.body.appendChild(a)}};this.start=function(){var t=this;"complete"!==document.readyState?window.addEventListener?window.addEventListener("load",function(){t.go()},!1):window.attachEvent&&window.attachEvent("onload",function(){t.go()}):t.go()};};try{(new g(100,"r","QSI_S_ZN_eDoIXhSDN98YlPo","https://zn6so4br3spbt61a5-sapdemo.siteintercept.qualtrics.com/SIE/?Q_ZID=ZN_6sO4Br3Spbt61a5")).start()}catch(i){}';

var functionCall = new Function(snippet);

return (functionCall());

}

});

});
Output of UI5
Survey Results at Qualtrics
We have successfully completed this project to Integrate Qualtrics Surveys In SAP UI5 Using JavaScript. If you have any queries or doubts. You can comment below, and we will guide you.
In today’s digital world, creating intuitive and responsive web applications is crucial for businesses. SAP UI5 is a powerful framework that helps developers build such applications with ease. It offers a rich set of tools and libraries to create seamless user interfaces.
On the other hand, OpenAI’s GPT-4-turbo is an advanced language model that excels in understanding and generating human-like text. Its new features bring a lot of exciting possibilities, especially when integrated with web applications like those built with SAP UI5.
This article explores how combining GPT-4-turbo with SAP UI5 can enhance your applications. From natural language queries and data summarization to predictive analysis and anomaly detection, we’ll cover practical ways to leverage these technologies to create smarter, more interactive applications.
Integrating GPT-4-turbo with SAP UI5
Why Integrate GPT-4-turbo?
Integrating GPT-4-turbo with your SAP UI5 applications can bring a host of benefits, making your apps smarter and more user-friendly. Here are a few reasons why you should consider this integration:
1. Enhanced User Interaction: GPT-4-turbo allows users to interact with your application using natural language. This means users can perform complex searches and queries just by typing or speaking in plain English, making your app more accessible and easier to use.
2. Powerful Data Analysis: With GPT-4-turbo, you can analyze and interpret large datasets quickly and accurately. This helps in generating summaries, identifying trends, and gaining insights that would be difficult to obtain manually.
3. Predictive Capabilities: Leverage the model’s ability to predict future trends based on historical data. This can be invaluable for planning, forecasting, and decision-making processes.
4. Anomaly Detection: Automatically detect outliers and anomalies in your data, helping you spot potential issues early and take corrective actions.
5. Automation and Efficiency: Automate routine tasks such as data cleaning, categorization, and report generation. This not only saves time but also reduces the risk of human error.
By integrating GPT-4-turbo, you can transform your SAP UI5 applications into intelligent, responsive tools that deliver a better experience for your users and provide deeper insights for your business.
Setting Up the Integration
Integrating GPT-4-turbo with your SAP UI5 application involves a few key steps. Here’s a simple guide to get you started:
Obtain API Key from OpenAI: In a previous post, we have already shared how you can set up the OpenAI Key. You can read it here: How to generate an API key for ChatGPT?
Implement the Service in Your Controller: Based upon different scenarios, implement OpenAI calls in your SAP UI5 project
Leveraging GPT-4-turbo Features in SAP UI5:
Practical Implementation Examples
Natural Language Queries: Queries that would not be filter-based but based upon your inputs. For example, you can ask the filter bar to do certain complex filtering without even choosing anything from the filter.
Data Summarization and Insights: There might be a lot of data for a particular table, and a summary for a particular row item can be easily gathered using AI.
Predictive Analysis: SAP has a different portal for analysis, reporting, and predictive AI. However, with AI integration, it can be achieved from the same report without further coding.
Anomaly Detection: If the data pattern and the standard are known, then AI can easily detect anomalies in data.
Example 1: Filtering Table Data Using Natural Language
Below is the complete code for implementing a search bar that accepts natural language queries to filter sales data in a table.
// Controller.js
sap.ui.define([
  "sap/ui/core/mvc/Controller",
  "rudelabs/rudelabs/js/OpenAIService",
  "sap/ui/model/json/JSONModel"
], function (Controller, OpenAIService, JSONModel) {
  "use strict";

  return Controller.extend("rudelabs.rudelabs.controller.GenerativeAI", {
      onInit: function () {
          // Load initial sales data into the model
          var oSalesData = {
              sales: this._generateSalesData(10)
          };
          var oModel = new JSONModel(oSalesData);
          this.getView().setModel(oModel);
      },

      _generateSalesData: function (n) {
          var aSalesData = [];
          for (var i = 0; i < n; i++) {
              aSalesData.push({
                  OrderID: "ORD" + (i + 1),
                  Customer: "Customer " + (i + 1),
                  Date: new Date(2023, Math.floor(Math.random() * 12), Math.floor(Math.random() * 28) + 1).toLocaleDateString(),
                  Amount: Math.floor(Math.random() * 2000) + 100
              });
          }
          return aSalesData;
      },

      onUserQuery: function () {
          var oTable = this.getView().byId("salesTable");
          var aData = oTable.getModel().getData().sales;

          var sUserQuery = this.getView().byId("userQueryInput").getValue();
          var sPrompt = `Filter the following sales data based on the user query: "${sUserQuery}". Data: ${JSON.stringify(aData)}. Please provide the filtered data in valid JSON format without any additional text or comments.`;

          OpenAIService.callOpenAI(sPrompt).then(function (response) {
              var aFilteredData = JSON.parse(response.choices[0].message.content.trim());
              oTable.getModel().setData({ sales: aFilteredData });
          }).catch(function (error) {
              console.error("Error calling OpenAI API:", error);
          });
      }
  });
});
// Controller.js
sap.ui.define([
  "sap/ui/core/mvc/Controller",
  "rudelabs/rudelabs/js/OpenAIService",
  "sap/ui/model/json/JSONModel"
], function (Controller, OpenAIService, JSONModel) {
  "use strict";

  return Controller.extend("rudelabs.rudelabs.controller.GenerativeAI", {
      onInit: function () {
          // Load initial sales data into the model
          var oSalesData = {
              sales: this._generateSalesData(10)
          };
          var oModel = new JSONModel(oSalesData);
          this.getView().setModel(oModel);
      },

      _generateSalesData: function (n) {
          var aSalesData = [];
              aSalesData.push( {
                "id": 1,
                "product": "2024 Toyota Camry",
                "date": "2024-05-15",
                "amount": 125
              },
              {
                "id": 2,
                "product": "2023 Ford F-150",
                "date": "2024-05-14",
                "amount": 87
              },
              {
                "id": 3,
                "product": "2022 Tesla Model 3",
                "date": "2024-05-13",
                "amount": 52
              },
              {
                "id": 4,
                "product": "2024 Honda Accord",
                "date": "2024-05-12",
                "amount": 98
              },
              {
                "id": 5,
                "product": "2023 Chevrolet Silverado",
                "date": "2024-05-11",
                "amount": 73
              },
              {
                "id": 6,
                "product": "2022 Hyundai Tucson",
                "date": "2024-05-10",
                "amount": 41
              },
              {
                "id": 7,
                "product": "2024 Kia Telluride",
                "date": "2024-05-09",
                "amount": 67
              },
              {
                "id": 8,
                "product": "2023 Volkswagen Tiguan",
                "date": "2024-05-08",
                "amount": 39
              },
              {
                "id": 9,
                "product": "2022 Nissan Altima",
                "date": "2024-05-07",
                "amount": 82
              },
              {
                "id": 10,
                "product": "2024 Jeep Wrangler",
                "date": "2024-05-06",
                "amount": 58
              });
          return aSalesData;
      },

      onGenerateSummary: function () {
          var sTextArea = this.getView().byId("summaryTextArea");
          var oTable = this.getView().byId("salesTable");
          var aData = oTable.getModel().getData().sales;
          var sPrompt = `Generate Sales Data Summary for the following data in 100 words: ${JSON.stringify(aData)}. The response should be in a paragraph discussing the sales of car as per data.`;
          OpenAIService.callOpenAI(sPrompt).then(function (response) {
              sTextArea.setValue(response.choices[0].message.content);
          }).catch(function (error) {
              console.error("Error calling OpenAI API:", error);
          });
      }
  });
});
OpenAI Service Code (OpenAIService.js)
No changes, same as mentioned in the previous example.
Output
Example 3: Predictive Analysis
Example 4: Anomaly Detection
Advanced Use Cases
Interactive Dashboards: Discuss creating dynamic and interactive dashboards that leverage GPT-4-turbo for real-time data analysis and visualization.
Automated Reports and Alerts: Explain how to generate automated reports and set up custom alerts based on specific data conditions.
User Feedback Integration: Demonstrate how to implement a feedback loop where users can provide feedback and receive intelligent suggestions from the system.
With the constant evolution of the web and the various platforms that power it, ensuring a seamless user experience is crucial. In SAP UI5, a key component that aids in enhancing this experience is the use of cookies. Through this article, we’ll delve into the realm of cookies in SAP UI5, why they’re essential, and how to set them up for optimal use.
What is a Cookie and why is it required in SAP UI5?
A cookie is a small piece of data sent from a website and stored in a user’s web browser. They remember stateful information for the stateless HTTP protocol. In SAP UI5, cookies play an essential role in retaining user preferences, maintaining sessions, or even tracking user interactions, ensuring users don’t have to re-enter preferences every time they revisit an application.
Client-side Cookies vs. server-side Cookies
In the realm of web development, cookies can generally be categorized into two types:
Client-side Cookies: These are stored on the user’s browser and can be read using JavaScript when the user revisits the site. They are primarily used for local preferences, theme settings, or even short-term tracking.
Server-side Cookies: These are processed on the web server and can be read on subsequent HTTP requests made to the server for the same domain. They are mainly utilized for sessions, user authentication, and more persistent tracking.
In SAP UI5, depending on your requirements, you might lean towards one type of cookie over the other, or even use a combination of both.
Set cookie and get a cookie with JavaScript in SAP UI5
Using JavaScript in SAP UI5 to set and retrieve cookies is straightforward.
Setting a Cookie:
function setCookie(name, value, days) {
    let expires = "";
    if (days) {
        const date = new Date();
        date.setTime(date.getTime() + (days*24*60*60*1000));
        expires = "; expires=" + date.toUTCString();
    }
    document.cookie = name + "=" + (value || "") + expires + "; path=/";
}
Usage:
setCookie("userPreference", "darkTheme", 7);
Getting a Cookie:
function getCookie(name) {
    const nameEQ = name + "=";
    const cookiesArray = document.cookie.split(';');
    for(let i=0; i < cookiesArray.length; i++) {
        let cookie = cookiesArray[i];
        while (cookie.charAt(0) == ' ') cookie = cookie.substring(1, cookie.length);
        if (cookie.indexOf(nameEQ) == 0) return cookie.substring(nameEQ.length, cookie.length);
    }
    return null;
}
When making AJAX calls in SAP UI5, you might need to send cookies along with your request. Here’s a simple way to do it:
Using the jQuery ajax method:
$.ajax({
    url: "https://yourapiendpoint.com/data",
    type: "GET",
    xhrFields: {
        withCredentials: true
    },
    success: function(data) {
        // Handle data here
    }
});
The withCredentials: true ensures that cookies are sent with the request. Remember that the server also needs to accept credentials from the origin by setting the appropriate CORS headers.
Installing Visual Studio Code (VS Code) for SAP UI5/Fiori development involves setting up VS Code with the appropriate extensions and tools to facilitate SAP UI5/Fiori application development. Follow these steps to get started:
Step 1: Install Visual Studio Code
1. Download Visual Studio Code from the [official website](https://code.visualstudio.com/).
2. Run the installer for your operating system (Windows, macOS, or Linux), and follow the installation instructions.
Step 2: Install Node.js and npm
SAP UI5/Fiori development often requires Node.js for running local servers, building projects, and managing dependencies.
1. Download the latest LTS version of Node.js from the [official website](https://nodejs.org/).
2. Run the installer and follow the prompts to install Node.js and npm (Node Package Manager), which comes bundled with Node.js.
Step 3: Install the UI5 CLI
The UI5 CLI is a command-line interface that simplifies the development and extension of SAP UI5 projects.
1. Open a terminal or command prompt.
2. Install the UI5 CLI globally using npm by running:
npm install --global @ui5/cli
Step 4: Install Visual Studio Code Extensions
Several VS Code extensions can enhance SAP UI5/Fiori development by providing features like syntax highlighting, code completion, and more. Consider installing the following extensions: 1. SAP Fiori Tools – Extension Pack: This extension pack includes tools for SAP Fiori development, like the Application Generator, Service Modeler, and more. You can find it by searching for “SAP Fiori Tools” in the Extensions view (`Ctrl+Shift+X`) in VS Code. 2. XML Tools: Useful for working with XML views in SAP UI5. 3. ESLint: Helps identify and fix JavaScript code issues. 4. Prettier – Code Formatter: Automatically formats JavaScript, XML, and other files.
5. To install an extension, type its name into the Extensions view search box in VS Code, select the correct extension from the list, and click the “Install” button.
Step 5: Configure a Project
To start developing an SAP UI5/Fiori application, you might want to create a new project or clone an existing one from a Git repository.
1. To create a new project, you can use the SAP Fiori tools or the UI5 CLI to generate a template project.
2. For SAP Fiori tools, follow the guided development process initiated from the Command Palette (`Ctrl+Shift+P`) by typing “Fiori: Open Application Generator” and following the prompts.
3. For the UI5 CLI, create a new directory for your project, navigate into it using the terminal, and run:
ui5 init
Then generate a new controller/view pair, or copy your existing project files into this directory.
Step 6: Start Development
1. Open your project in VS Code by selecting “File > Open Folder…” and navigating to your project directory.
2. Use the terminal in VS Code (`Ctrl+` `) to run UI5-related commands, such as:
ui5 serve
to start a local development server.
Step 7: Test Your Application
Access your application by opening the URL provided by the `ui5 serve` command in a web browser.
By following these steps, you’ll have a development environment set up in Visual Studio Code for SAP UI5/Fiori development. Remember to explore and adjust settings and configurations as you become more familiar with the tools and your project’s specific needs.