Category: ABAP

ABAP

  • SAP ABAP RAP / Restful Application Programming Model: Projected association is not draft enabled

    SAP ABAP RAP / Restful Application Programming Model: Projected association is not draft enabled

    In case you are getting this error:

    Error in entity ‘(Projection_View_Name(CDS))’: Projected association _AssociationName of Projection_View_Name is not draft enabled.”

    And you tried to fix it, but now getting this error:

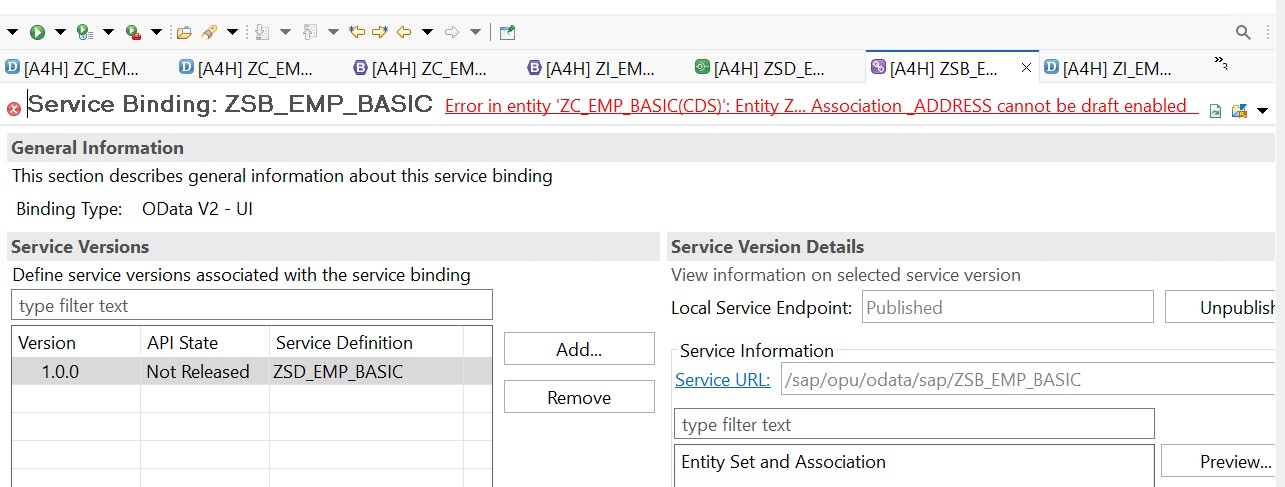
    “Error in entity ‘Projection_View_Name(CDS)’: Entity Projection_View_Name: Association _AssociationName cannot be draft enabled.”

    SAP Community Ref: Similar question on SAP

    You can perform the following steps to fix it:

    Step 01: Start from your Behaviour Definition [both consumption/projection view as well as I view] and check if the draft is enabled everywhere as required.

    Step 02: If you have enabled draft at every association level using {with draft;} and still not able to fix it, then visit each CDS file linked with the Behaviour definition and try to hove over all the yellow underlines and fix them [by clicking right click and choosing “Quick Fix”]

    Step 03: Also, check if you have missed adding etag master at the association level behaviour definition.

    Step 04: Try to change the cardinality from [0..*] to [0..1] and then try to activate the Service Binding again.

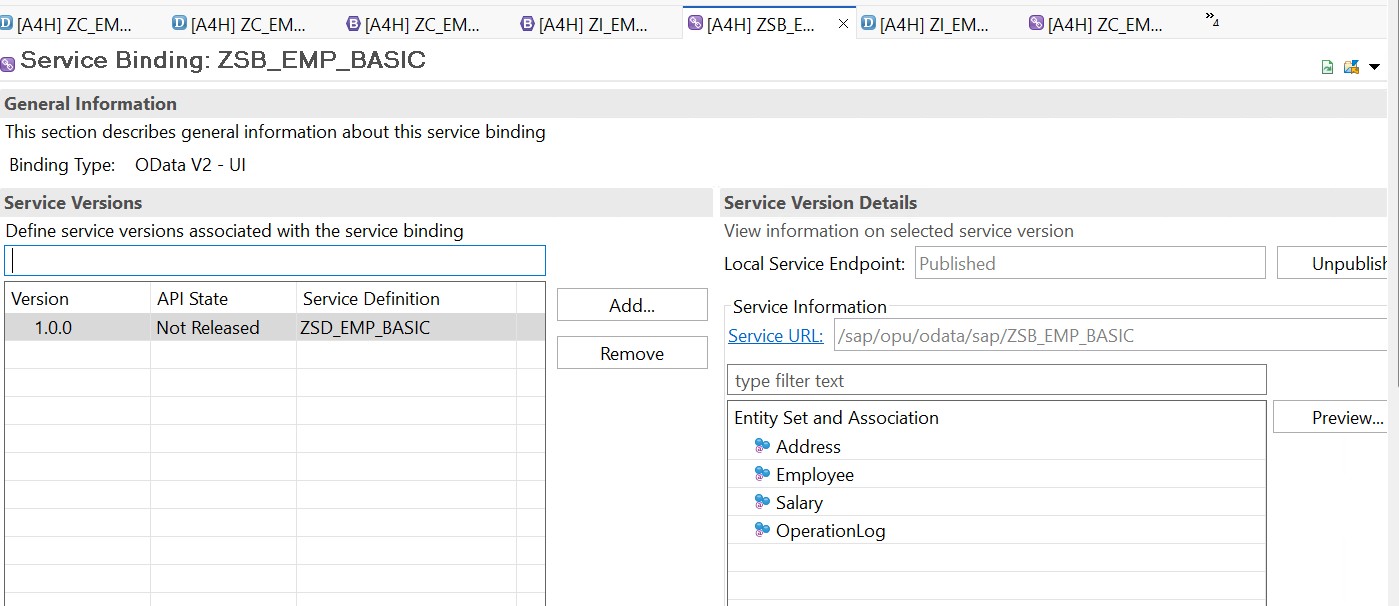
    If the above steps are fine, and you try to refresh the screen and activate the screen, you will see the success screen as below:

    You can check the SAP ABAP RAP Course here.

  • A Comprehensive Guide to ABAP Core Data Services (CDS) for SAP Developers

    A Comprehensive Guide to ABAP Core Data Services (CDS) for SAP Developers

    Check out our in-depth guide to ABAP Core Data Services (CDS) for SAP HANA. This PDF walks you through CDS basics, syntax, annotations, and more advanced stuff like RAP integration, performance tweaks, and even machine learning examples. It’s great for SAP developers and architects, packed with real-world examples, easy-to-follow tutorials, and hands-on exercises to help you build SAP Fiori apps, run analytical queries, or create cloud-ready solutions. Grab it now from gocoding.org to level up your SAP skills and make data modeling with CDS a breeze.

  • Everything you need to know about SAP ABAP Unit Test

    SAP ABAP Unit Test is a feature in the SAP Advanced Business Application Programming (ABAP) environment that allows developers to create and run unit tests for their code. This promotes better code quality, readability, and maintainability. Let’s delve deep into the concept:

    Introduction

    • ABAP Unit is SAP’s native framework for creating and executing unit tests in the ABAP development environment.
    • Unit tests are designed to test individual parts (units) of the software, typically at the method or function level.
    • It allows developers to test individual units of code, such as methods, function modules, and subroutines. This can help to identify and fix bugs early in the development process, and improve the overall quality of the code.

    Purpose of ABAP Unit Test

    • Quality Assurance: Ensures that individual units of source code are working as expected.
    • Refactoring Security: Allows developers to make changes to the codebase without fear of unintentionally introducing errors.
    • Documentation: Unit tests can serve as documentation because they demonstrate how certain functionality is expected to work.

    How It Works

    • ABAP Unit tests are written in the ABAP language itself.
    • The tests are generally located in the same development object or class they’re testing, but they are clearly separated from the actual implementation.
    • The tests can be executed in the ABAP development environment. The system provides instant feedback on whether the tests pass or fail.

    Key Concepts

    • Test Classes: These are special classes in ABAP where unit tests are defined. They typically end with the suffix _UT.
    • Test Methods: These are methods inside test classes that contain the actual test logic. They are marked with the addition FOR TESTING.
    • Test Fixtures: Methods that set up a consistent test environment before each test run. They are often used to initialize data or configurations needed for the tests.
    • Assertions: Used to check if a particular condition is met. If an assertion fails, the test fails.

    Benefits

    • Immediate Feedback: Developers receive immediate feedback after making changes, allowing for quicker debugging.
    • Consistency: Helps in maintaining consistency across the development environment as all developers can run the same tests.
    • Reduces Bugs: By catching issues early in the development process, it can significantly reduce the number of bugs in the production environment.
    • Facilitates Collaboration: Makes it easier for teams to collaborate as they can rely on tests to ensure the integrity of their code.

    Best Practices

    • Isolation: Unit tests should be isolated and independent. The result of a test should not be dependent on whether other tests pass or fail.
    • Granularity: Test only one aspect or behavior at a time.
    • Automate: Ideally, run unit tests as part of an automated build or integration process.
    • Consistency: Ensure that unit tests are consistently maintained and updated as the codebase evolves.

    Limitations

    • Unit tests in ABAP or any language are not a substitute for other testing levels like integration tests or end-to-end tests.
    • They don’t typically interact with external systems like databases or third-party services, so while they can ensure a function works as expected in isolation, they can’t guarantee broader system functionality.

    Creation in ABAP

    • Local Test Classes: Within the ABAP environment, developers can create local classes (within programs or global classes) to write unit tests. These are typically nested within the main program or global class.
      CLASS lcl_test DEFINITION FOR TESTING INHERITING FROM cl_b2p_call.
      
        PRIVATE SECTION.
          DATA: lt_key       TYPE TABLE OF /bobf/t_frw_key,
                lt_messages  TYPE TABLE OF symsg_tab,
                lv_error_msg TYPE string.
      
        METHODS:
          setup,
          teardown,
          test_send_outbproxy_success,
          test_send_outbproxy_error.
      
      ENDCLASS.
      
      CLASS lcl_test IMPLEMENTATION.
      
        METHOD setup.
          CLEAR lt_key.
          CLEAR lt_messages.
        ENDMETHOD.
      
        METHOD teardown.
          " Clean up if necessary
        ENDMETHOD.
      
        METHOD test_send_outbproxy_success.
          DATA: lt_key TYPE TABLE OF /bobf/t_frw_key,
                ls_key TYPE /bobf/t_frw_key.
      
          " Prepare input data
          ls_key-key = 'B7036E6334A61EEE96EC134C77E96235'.
          APPEND ls_key TO lt_key.
      
          " Call the method being tested
          CALL METHOD send_outbproxy
            EXPORTING
              it_key      = lt_key
            IMPORTING
              et_messages = lt_messages
              ev_error    = lv_error_msg.
      
          " Assertions
          cl_abap_unit_assert=>assert_equals( act = lv_error_msg
                                              exp = ''
                                              msg = 'Expected no error message for success.' ).
          
          cl_abap_unit_assert=>assert_equals( act = lines( lt_messages )
                                              exp = 1
                                              msg = 'Expected one message in the message table for success.' ).
      
          " Add more assertions based on your specific success criteria.
      
        ENDMETHOD.
      
        METHOD test_send_outbproxy_error.
          DATA: lt_key TYPE TABLE OF /bobf/t_frw_key,
                ls_key TYPE /bobf/t_frw_key.
      
          " Prepare input data
          ls_key-key = 'InvalidKey'.  " Simulate an invalid key
          APPEND ls_key TO lt_key.
      
          " Call the method being tested
          CALL METHOD send_outbproxy
            EXPORTING
              it_key      = lt_key
            IMPORTING
              et_messages = lt_messages
              ev_error    = lv_error_msg.
      
          " Assertions
          cl_abap_unit_assert=>assert_not_equals( act = lv_error_msg
                                                  exp = ''
                                                  msg = 'Expected an error message for invalid input.' ).
          
          cl_abap_unit_assert=>assert_equals( act = lines( lt_messages )
                                              exp = 1
                                              msg = 'Expected one message in the message table for error.' ).
      
          " Add more assertions based on your specific error criteria.
      
        ENDMETHOD.
      
      ENDCLASS.
      

      In this example:

      • The setup and teardown methods are used for initialization and cleanup.
      • test_send_outbproxy_success and test_send_outbproxy_error are test methods.
      • In each test method, you prepare the input data (lt_key), call the method being tested (send_outbproxy), and then perform assertions to check if the method behaves as expected for success and error cases.

      You can adjust the assertions and test data based on your specific requirements and the behavior of the SEND_OUTBPROXY method.

    • Methods: Within these classes, specific methods are marked with the addition FOR TESTING to indicate they are test methods.
    • Assertions: Inside the test methods, you use ABAP statements like ASSERT or ASSERT_EQUALS to validate the expected outcomes.

    Test in ADT and ABAP SE24

    • ADT (ABAP Development Tools): This is essentially the Eclipse-based IDE for ABAP. Developers can write and execute unit tests directly from here.
    • SE24: This is the Class Builder in the SAP GUI. You can create global classes, which include your test classes and test methods, and execute them directly from this transaction.

    Checkman T Code in SAP

    • CHECKMAN is the T-code for the Code Inspector, a tool for static code analysis in the SAP environment.
    • It helps in identifying performance issues, security vulnerabilities, and violations of coding conventions.
    • While it’s not directly a unit testing tool, it’s vital for ensuring code quality and adherence to best practices.

    Execute Unit Test in ABAP

    • After writing the unit tests, they can be executed directly from the ABAP environment.
    • When you run the unit tests, ABAP provides a detailed log of which tests passed and which failed.
    • For any failed test, you get an error message pointing out the assertion or the line of code causing the failure.

    ABAP Coverage

    • Test coverage in ABAP measures the amount of your codebase that’s tested by unit tests.
    • The ABAP Test Cockpit and ABAP Development Tools in Eclipse provide insights into which lines of code, methods, or classes have been executed during the tests.
    • This is crucial because high test coverage often correlates with fewer bugs, though it’s not a guarantee of software quality by itself.

    ATC Errors during ABAP Unit Test

    • ATC (ABAP Test Cockpit): It’s a central tool for developers to check the quality of their ABAP code.
    • While executing unit tests, you might come across ATC errors. These could be due to a range of issues, from syntax errors to violations of best practices or custom checks defined in your SAP environment.
    • Addressing ATC errors ensures your code is not only functionally correct but also adheres to established coding standards.

    Conclusion

    The ABAP Unit Test framework is a powerful tool in the SAP development toolkit. When used effectively, it can greatly enhance code quality, reduce debugging time, and ensure smoother deployments. Like all testing methodologies, it’s most effective when used in conjunction with other testing and quality assurance practices.

  • Everything you need to know about SAP ABAP New Syntax 7.5

    Everything you need to know about SAP ABAP New Syntax 7.5

    Introduction

    Hey, code enthusiasts! Remember the days when SAP ABAP felt a bit like trying to chat using an old-school rotary phone? Well, not anymore! With SAP ABAP 7.5, we’ve entered the age of smartphones! (Okay, not literally, but in the syntax sense.)

    Comparison between old and new syntax with example

    Before I bore you with words, let’s see a quick example to show off this shiny new syntax.

    Old Way:

    DATA: lt_materials TYPE TABLE OF mara,
          ls_material  TYPE mara.
    SELECT * FROM mara INTO TABLE lt_materials WHERE matnr = '1000'.
    READ TABLE lt_materials INTO ls_material WITH KEY matnr = '1000'.
    

    New, Cooler Way in 7.5:

    DATA(lt_materials) = VALUE #( SELECT * FROM mara WHERE matnr = '1000' ).
    DATA(ls_material)  = VALUE #( lt_materials[ matnr = '1000' ] ).
    

    See the difference? The new syntax is more concise and feels modern. It’s like comparing texting with emojis to writing a full-blown letter. Both get the message across, but one’s definitely snazzier!

    Why we should use the new SAP Syntax

    So, you might be thinking, “Cool example, but why should I change?” Well, here are some compelling reasons:

    • It’s Efficient: The new syntax is more streamlined, which means less code and quicker results. And let’s be honest, who doesn’t want that?
    • Readability: If you’ve ever tried deciphering someone else’s code (or even your own from months ago), you know the struggle. With the new syntax, the code structure is clearer, making it easier to read, understand, and maintain.
    • It’s Modern: Just like updating your phone or your favorite app, updating your syntax keeps you current. It aligns with the latest programming paradigms and makes sure you’re ready for whatever SAP throws next.


    Old and new ABAP syntax – overview sheet

    If you see this Consider using this
    DATA and FIELD-SYMBOLS declarations Inline declarations
    MOVE CORRESPONDING Constructor expression CORRESPONDING, or CL_ABAP_CORRESPONDING
    struc1-field1 = struc2-fielda
    struc1-field2 = struc2-fieldb
    Constructor expression CORRESPONDING, or CL_ABAP_CORRESPONDING;

    Constructor expression VALUE

    CREATE DATA / CREATE OBJECT Constructor expression NEW
    GET REFERENCE OF Constructor expression REF
    variable only used once, e.g. parameter for a method call Constructor expression VALUEInline declarations
    helper variable for type conversion Constructor expression CONV
    ?= Constructor expression CAST
    assigning a value to a single variable within several case or if blocks, e.g. IF cond. var = 1. ELSE. var = 2. ENDIF. Constructor expressions SWITCH or COND
    READ TABLE Table expressions; Note: throws exception, while READ TABLE sets sy-subrc. Catch exception and handle error case, or use a standard value
    READ TABLE … TRANSPORTING NO FIELDS line_exists( … ) or line_index( … )
    internal table WITH DEFAULT KEY suitable key, or WITH EMPTY KEY
    LOOP AT… FOR … IN in constructor expressions
    [result of method call] IS (NOT) INITIAL, or [result of method call] = abap_true/abap_false predicative method call ( omit the ” = abap_true” part )
    DO / WHILE FOR … UNTIL / WHILE in constructor expressions
    calculating or otherwise assembling one result from input data, e.g. from table rows Constructor expression REDUCE; Note: “one result” can be a value, but also a table or complex object
    LOOP AT … AT NEW, or other means of going through grouped data LOOP AT … GROUP BY … / LOOP AT GROUP
    LOOP + DELETE Constructor expression FILTER
    type checking (?= with TRY/CATCH block, or usage of CL_ABAP_TYPEDESCR) IS INSTANCE OF, CASE TYPE OF
    CONCATENATE; string literals String templates
    SELECT new SQL expressions; use @ to escape host variables

    The above difference is taken from here.

    ABAP Syntax 7.5

    You can read the latest updates over here.

    And there you have it – a quick trip down SAP ABAP 7.5 lane. So, next time you’re about to dive into an ABAP project, give this new syntax a spin. You might just find it as refreshing as a cold drink on a hot day! 🍹🔆 Happy coding! 🚀

  • How to Upport and Down Port in SAP using TCode UDO

    Transporting changes between systems is crucial for maintaining consistency across your SAP landscape. Below are the steps to perform this operation:

    How to Upport and Down Port in SAP using TCode UDO

    1. Initiate the Process in the Source System:
    – Go to the system from which you want to port changes to other systems. [or you can also do from the target system where you are actually porting] – Open the SAP GUI and access the `UDO` transaction.
    – You will need the following parameters:
    – Source System Transport Request (TR)
    – Source System Name
    – Target System Name

    2. Execute in the Target System:
    – Log into the target system where you want the changes to be imported.
    – Open TCode `UDO`.
    – Input the following details:
    – Transport Request (TR) from the source system.
    – Source System Name accompanied by the client number.
    – Target System Name.

    3. Allocate a New Transport Request (TR):
    – Once the above details are provided, the system may prompt you to assign a new TR for this transport. This is to ensure that the changes are tracked and can be rolled back if needed.
    – Input or create a new TR as instructed.

    4. Confirm and Execute:
    – After all details are in place, review and confirm.
    – Execute the transport. The system will begin the process of porting the changes from the source to the target system.

    5. Monitor & Verify:
    – Upon completion, ensure that the transport has been successful.
    – Verify in the target system to ensure all ported changes are reflecting correctly.

  • How to create SAP Crystal Reports Using Blank Report Templates

    What are SAP Crystal Reports?

    SAP Crystal Reports is a powerful business intelligence tool used for designing and generating reports from various data sources. It provides a robust platform for creating highly formatted, pixel-perfect reports that can be distributed electronically or printed. Crystal Reports is widely used across industries to extract meaningful insights and present data in a visually appealing and understandable manner.

    Key features and functionalities of SAP Crystal Reports include:

    1. Data Connectivity: Crystal Reports allows you to connect to a wide range of data sources, including databases like SAP HANA, Oracle, Microsoft SQL Server, and more. It supports both relational and multidimensional data sources, enabling you to access and analyze data from different systems.

    2. Report Design and Layout: The Crystal Reports designer provides a user-friendly interface for designing reports. It offers a WYSIWYG (What You See Is What You Get) editor that allows you to arrange fields, apply formatting, insert charts, images, and other graphical elements. You can create complex reports with grouping, sorting, subreports, cross-tabs, and drill-down functionality.

    3. Powerful Formulas and Expressions: Crystal Reports includes a formula editor that enables you to create custom calculations, expressions, and logic within your reports. This allows for advanced data manipulation, calculations, and conditional formatting based on specific criteria.

    4. Interactive Features: Crystal Reports supports interactive features such as drill-downs, parameterized reports, and dynamic sorting. Users can explore the data and navigate through different levels of details within the report, enhancing the data analysis experience.

    5. Export and Distribution: Reports created in Crystal Reports can be exported to various formats, including PDF, Excel, Word, HTML, and more. This flexibility enables sharing and distribution of reports through email, web portals, or printing.

    6. Integration with SAP and Other Systems: Crystal Reports seamlessly integrates with SAP applications and systems, allowing you to leverage data and business logic directly from SAP. It can also be integrated with other business intelligence tools and platforms to complement larger analytics and reporting solutions.

    7. Report Viewing and Delivery: Crystal Reports provides runtime components and viewers that allow end-users to view and interact with reports without requiring the full design environment. These viewers can be embedded in web applications, desktop applications, or SAP portals for easy access to reports.

    Overall, SAP Crystal Reports empowers organizations to create comprehensive and visually appealing reports that facilitate data-driven decision-making. It is a versatile tool that offers extensive data connectivity, design flexibility, and distribution options, making it a popular choice for reporting and business intelligence needs.

    Steps to Create SAP Crystal Reports Using Blank Report Templates

    To create SAP Crystal Reports using the Blank Report template, you can follow these steps:

    1. Launch the SAP Crystal Reports application on your computer.
    2. Click on “File” in the top menu and select “New” to create a new report.
    3. In the New Report Wizard window, choose “Blank Report” as the template and click “OK.”

    4. The Crystal Reports designer interface will open with a blank canvas. Here, you can design your report by adding fields, formatting elements, and arranging the layout. Follow these steps to create a basic report:

    a. Connect to a Data Source [if there is a data source]:
    – Click on “Database” in the top menu and select “Database Expert.”
    – In the Database Expert window, you can select the data source you want to connect to, such as an SAP database, Microsoft SQL Server, Oracle, etc.
    – Follow the prompts to establish the connection and specify the necessary credentials or connection details.

    b. Add Fields to the Report [if there is a data source]:
    – From the “Field Explorer” pane on the right, expand the data source you connected to and locate the desired fields or tables.
    – Drag and drop the required fields onto the report canvas. You can place them in the report header, details section, or any other desired location.

    c. Format and Customize the Report:
    – Use the various formatting options available in the top menu and toolbar to customize the appearance of the report.
    – You can modify font styles, colors, alignments, add borders, insert images, and more to enhance the visual presentation of the report.

    d. Arrange Report Sections:
    – Crystal Reports divides the report into sections such as Page Header, Report Header, Details, Report Footer, etc.
    – You can resize or reposition these sections by clicking and dragging the section boundaries.
    – To add additional sections, right-click on the report canvas, select “Insert,” and choose the desired section type.

    e. Preview and Save the Report:
    – To preview your report, click on the “Preview” tab in the lower section of the designer interface. This allows you to see how the report will look when generated.
    – Once you are satisfied with the design, click on “File” in the top menu and select “Save” or “Save As” to save the report file (.rpt) to a desired location on your computer.

    5. After saving the report, you can generate it by providing the necessary data at runtime using Crystal Reports runtime libraries or by integrating it into an application or SAP system.

    By following these steps, you can create a basic SAP Crystal Report using the Blank Report template and customize it according to your reporting requirements.

    Tutorial Video

    You can watch the video below to learn implementation:

    [embedyt] https://www.youtube.com/watch?v=m1KD1fT5tII[/embedyt]
  • What is the difference between SAP Crystal Reports and SAP SmartForms

    SAP Crystal Reports and SAP SmartForms are two different tools used for reporting and form generation within the SAP ecosystem. Here are the key differences between the two:

    1. Purpose and Functionality

    – SAP Crystal Reports: It is primarily a reporting tool used to design and generate pixel-perfect, highly formatted reports. Crystal Reports allows you to connect to various data sources, create complex reports with sorting, grouping, aggregations, and add interactive features like drill-downs, charts, and parameters.

    – SAP SmartForms: It is a form generation tool that enables the creation of structured, interactive forms. SmartForms are typically used for printing purposes, such as generating purchase orders, invoices, or other business documents. SmartForms provide basic layout capabilities, support for tables, graphics, and can be integrated with SAP workflows.

    2. Design and Layout

    – Crystal Reports: It offers a rich and flexible design environment with a WYSIWYG (What You See Is What You Get) editor. You have precise control over the placement of elements, formatting options, and can design complex reports with multiple sections, subreports, and cross-tabulations.

    – SmartForms: The design and layout capabilities in SmartForms are more structured and focus on generating forms with fixed positioning. It provides a hierarchical layout, allowing you to define pages, windows, and individual elements within them. SmartForms have limited design features compared to Crystal Reports but are optimized for printing scenarios.

    3. Integration with SAP Systems

    – Crystal Reports: It can connect to various data sources, including SAP systems, and leverage the SAP BusinessObjects suite for advanced reporting and analytics. Crystal Reports can access data from SAP’s Business Warehouse (BW) and other databases, making it suitable for creating comprehensive reports across different systems.

    – SmartForms: It is tightly integrated with SAP systems and is part of the SAP application server. SmartForms directly access SAP data and can utilize the system’s business logic and integration with workflows. It is well-suited for generating forms that are closely tied to SAP processes.

    4. User-Friendliness and Learning Curve

    – Crystal Reports: It provides a more comprehensive and feature-rich reporting environment, which can result in a steeper learning curve for new users. Designing complex reports may require advanced knowledge of the tool and database querying concepts.

    – SmartForms: Compared to Crystal Reports, SmartForms have a simpler and more structured design interface, making it relatively easier to create basic forms. Users familiar with SAP transactions and workflows may find it easier to work with SmartForms.

    In summary, SAP Crystal Reports is a powerful reporting tool suitable for designing detailed reports with various data sources, while SAP SmartForms is a more specialized form generation tool integrated with SAP systems, primarily used for creating structured, printable forms tied to SAP processes. The choice between the two depends on your specific reporting or form generation requirements within the SAP environment.

  • Create a SAP ABAP Project using ChatGPT

    What are SAP ABAP Projects, and why do we need them?

    SAP ABAP (Advanced Business Application Programming) is a programming language used to develop applications for the SAP software platform. SAP ABAP projects are collections of development objects and programs that are created, tested, and deployed as a unit.

    There are several reasons why SAP ABAP projects are necessary:

    1. Organization: SAP ABAP projects provide a structured way to organize and manage development objects and programs. This makes it easier to keep track of changes, collaborate with team members, and manage version control.
    2. Reusability: SAP ABAP projects make it easier to reuse code and development objects across different projects. This reduces the time and effort required for development and maintenance and helps ensure consistency and quality in the code.
    3. Deployment: SAP ABAP projects provide a convenient way to deploy code and development objects from one system to another. This makes it easier to test and roll out changes to production systems.
    4. Integration: SAP ABAP projects enable integration with other SAP components and systems, such as SAP HANA and SAP Fiori. This allows for the development of custom applications that can interact with other SAP systems and components.

    Overall, SAP ABAP projects are an essential tool for organizations that use SAP software, as they help streamline and optimize the development, deployment, and management of custom applications.

    How to do setup for SAP ABAP Development IDE?

    Here is a high-level overview of the steps to set up an SAP ABAP development environment:

    1. Obtain an SAP system: You will need an SAP system to develop and test your ABAP code. This can be either an SAP Developer Edition, which is a free version of SAP for development purposes, or a full-fledged SAP system from a service provider.
    2. Install an ABAP Development Tools (ADT) or ABAP in Eclipse: To develop ABAP code, you need a development environment. SAP provides the ABAP Development Tools (ADT) in Eclipse, which is a free development environment that you can use to develop and test ABAP code.
    3. Create a Development Project: Once you have the ABAP Development Tools installed, you can create a new development project. This project will contain all the development objects and programs that you create as part of your development work.
    4. Develop and Test your Code: You can now start developing and testing your ABAP code within the development project. The ABAP Development Tools provide a range of features, such as syntax highlighting, code completion, and debugging, to help you in this process.
    5. Deploy your Code: Once you have completed your development work and thoroughly tested your code, you can deploy your code to the SAP system. This can be done using the ABAP Development Tools or through the SAP GUI.
    6. Maintenance and Updates: Over time, you may need to make changes to your code or add new features. The ABAP Development Tools provide a range of features for maintaining and updating your code, such as version control and code comparison.

    This is just a high-level overview of the setup process for SAP ABAP development. The exact steps will depend on the specifics of your system and environment, but the ABAP Development Tools provide extensive documentation and support to help you get started.

    How to use ChatGPT to create an SAP ABAP Project?

    Step 01: Visit ChatGPT Portal: https://chat.openai.com/chat

    Step 02: Type your query; you can ask regarding a single step related to your UI5 issue or can ask ChatGPT to generate code for the entire project. We will ask ChatGPT to create a project with table forms and CRUD operations.

    Step 03: We asked ChatGPT to create an SAP ABAP Report that takes two input and have the option to do sum, subtraction, multiple, and deletion of the entered numbers. We got the given output:

    generate abap code using chatgpt

    Here is an example of an SAP ABAP report that takes two input values, performs arithmetic operations on them based on the user’s selection, and outputs the result (In our case, we have create a Report in SE38 and named it ZCHATGPTGEN):

    REPORT ZCHATGPTGEN.
    
    
    PARAMETERS p_num1 TYPE n.
    PARAMETERS p_num2 TYPE n.
    
    CONSTANTS : rbSelected TYPE c LENGTH 1 VALUE 'X'.
    
    DATA : p_txt type c LENGTH 100.
    
    SELECTION-SCREEN BEGIN OF BLOCK frame1 WITH FRAME TITLE text-001.
      SELECTION-SCREEN ULINE /10(40).
    
      SELECTION-SCREEN BEGIN OF LINE.
        SELECTION-SCREEN POSITION 15.
        PARAMETERS: rb1 RADIOBUTTON GROUP rb.
        SELECTION-SCREEN COMMENT 20(30) text-002.
      SELECTION-SCREEN END OF LINE.
    
      SELECTION-SCREEN BEGIN OF LINE.
        SELECTION-SCREEN POSITION 15.
        PARAMETERS: rb2 RADIOBUTTON GROUP rb.
        SELECTION-SCREEN COMMENT 20(30) text-003.
      SELECTION-SCREEN END OF LINE.
    
      SELECTION-SCREEN BEGIN OF LINE.
        SELECTION-SCREEN POSITION 15.
        PARAMETERS: rb3 RADIOBUTTON GROUP rb.
        SELECTION-SCREEN COMMENT 20(30) text-004.
      SELECTION-SCREEN END OF LINE.
    
       SELECTION-SCREEN BEGIN OF LINE.
        SELECTION-SCREEN POSITION 15.
        PARAMETERS: rb4 RADIOBUTTON GROUP rb.
        SELECTION-SCREEN COMMENT 20(30) text-005.
      SELECTION-SCREEN END OF LINE.
    
      SELECTION-SCREEN ULINE /10(40).
    SELECTION-SCREEN END OF BLOCK frame1.
    
    DATA: l_result TYPE n.
    
    START-OF-SELECTION.
    IF rb1 = rbSelected.
       l_result = p_num1 + p_num2.
    ELSEIF rb2 = rbSelected.
       l_result = p_num1 - p_num2.
    ELSEIF rb3 = rbSelected.
      l_result = p_num1 * p_num2.
      ELSEIF rb4 = rbSelected.
      IF p_num2 = 0.
            MESSAGE 'Division by zero is not allowed!' TYPE 'E'.
            LEAVE TO SCREEN 0.
          ENDIF.
          l_result = p_num1 / p_num2.
    ENDIF.
    
    
      WRITE: / 'Result:', l_result.

    Output

    How to use ChatGPT to create an SAP ABAP Project.

    How will ChatGPT impact ABAPer Life and Jobs?

    As a language model, OpenAI’s GPT-3, including ChatGPT, has the potential to impact various aspects of the lives and jobs of ABAP developers. Here are a few ways in which it could have an impact:

    1. Automation of repetitive tasks: GPT-3 has the ability to perform repetitive tasks, such as coding and testing, quickly and accurately. This could lead to increased efficiency and productivity, freeing up time for ABAP developers to focus on more complex and strategic tasks.
    2. Improved accuracy and quality of code: GPT-3 can provide suggestions and generate code based on natural language input. This can help reduce the likelihood of errors and improve the overall quality of the code.
    3. Assistance with documentation: GPT-3 can assist with documentation and help create comprehensive and accurate documentation for ABAP projects.
    4. Knowledge transfer: GPT-3 can help with knowledge transfer between team members and across organizations. This can help ensure that important information and best practices are shared and retained.
    5. New job opportunities: GPT-3 can also create new job opportunities, such as roles focused on developing and integrating AI solutions into SAP systems.

    It is important to note that while GPT-3 has the potential to impact ABAP developers in a number of positive ways, it is also important for organizations to consider the potential challenges and limitations of using AI technologies. Additionally, as with any technology, it is crucial for ABAP developers to continually upskill and adapt to new technologies and developments in the field.

    How can ChatGPT assist in Knowledge transfer?

    ChatGPT can assist in knowledge transfer in several ways:

    1. Natural Language Processing (NLP) based search and retrieval: ChatGPT can be used to search and retrieve relevant information based on natural language queries. This can help ABAP developers quickly find the information they need, without having to navigate through multiple sources or search engines.
    2. Documentation: ChatGPT can assist with creating and maintaining documentation for ABAP projects. It can provide information on specific topics, such as code snippets and best practices, and assist with generating documentation clearly and concisely.
    3. Q&A: ChatGPT can also act as a virtual assistant, answering questions and providing guidance to ABAP developers. This can help with knowledge transfer by providing quick access to information and helping to bridge the gap between experts and less experienced team members.
    4. Personalized learning: ChatGPT can also be used for personalized learning and training. It can provide guidance and feedback to ABAP developers, helping them to learn new skills and improve their expertise.

    By providing quick and accessible information and assistance, ChatGPT can help ABAP developers to efficiently access and transfer knowledge within their organization. This can help to improve the overall quality and efficiency of ABAP projects, as well as foster a culture of continuous learning and improvement.

    Tutorial Video

    You can watch the video below to learn implementation:

    [embedyt] https://www.youtube.com/watch?v=AzutmlntNKI[/embedyt]
  • How to Integrate ChatGPT in SAP ABAP

    Introduction

    A general idea of how to integrate ChatGPT with SAP ABAP:

    1. First, you would need to have access to an instance of the ChatGPT model, either through the OpenAI API or by running the model locally.
    2. Next, you would need to create an ABAP program that calls the ChatGPT API and passes it input text, such as a user’s question.
    3. The program would then need to handle the API response and parse the generated text output.
    4. Finally, the program would need to display the generated text in an appropriate format, such as in an SAP GUI screen or in an output file.

    Here’s an example of some code that could be used in an ABAP program to call the OpenAI API and get a response from ChatGPT:

    CALL FUNCTION 'HTTP_POST'
      EXPORTING
        url = 'https://api.openai.com/v1/engines/davinci/completions'
        encoding = 'UTF-8'
      IMPORTING
        response = l_response
      CHANGING
        data = l_data
        headers = l_headers
      EXCEPTIONS
        http_communication_failure = 1
        http_invalid_state = 2
        http_processing_failed = 3
        OTHERS = 4.


    How to Integrate ChatGPT in SAP ABAP

    As shown in below image, we will follow three simple steps to integrate ChatGPT APIs within SAP ABAP Report.

    Integrate ChatGPT in SAP ABAP

    1. Get API of Open AI

    We have already discussed all the steps involved regarding API creation in this article.

    2. Create ABAP Report

    Go to SE38, and create a new ABAP Report. Create one Input Parameter as shown below:

    ChatGPT ABAP Report

    3. Integrate ChatGPT Call

    Write the given code in your report:

    REPORT ZCHATGPT.
    
    PARAMETERS: l_ques type string.
    
    data: l_response type string,
          l_data type string,
          lv_payload_x type xstring,
          l_max_tokens type i.
    
    "l_ques = 'What is the meaning of life?'. EXAMPLE
    l_max_tokens = 50.
    l_data = '{' && '"prompt":' && '"' && l_ques && '",' && '"max_tokens":' && l_max_tokens && '}'.
    
    CALL FUNCTION 'SCMS_STRING_TO_XSTRING'
    EXPORTING
    text = l_data
    IMPORTING
    buffer = lv_payload_x.
    
       DATA: lo_http_client TYPE REF TO if_http_client.
        DATA: response TYPE string,
              lv_auth  TYPE string.
        CONSTANTS : lv_url TYPE string VALUE 'https://api.openai.com/v1/engines/davinci/completions'.
    
    
          "create HTTP client by url
          CALL METHOD cl_http_client=>create_by_url
            EXPORTING
              url                = lv_url
            IMPORTING
              client             = lo_http_client
            EXCEPTIONS
              argument_not_found = 1
              plugin_not_active  = 2
              internal_error     = 3
              OTHERS             = 4.
    
          IF sy-subrc <> 0.
            "error handling
          ENDIF.
    
          "setting request method
          lo_http_client->request->set_method('POST').
    
          "adding headers
          lo_http_client->request->set_header_field( name = 'Content-Type' value = 'application/x-www-form-urlencoded' ).
          lo_http_client->request->set_header_field( name = 'Accept' value = 'application/json' ).
          lo_http_client->request->set_header_field( name = 'Authorization' value = 'Bearer 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' ).
    
          lo_http_client->request->set_form_field(
      EXPORTING
        name  = 'prompt'                    " Name of form field
        value =   l_ques   ).
    
    
          "lo_http_client->request->set_data( lv_payload_x ).
    
          "Available Security Schemes for productive API Endpoints
          "OAuth 2.0
    
          CALL METHOD lo_http_client->send
            EXCEPTIONS
              http_communication_failure = 1
              http_invalid_state         = 2
              http_processing_failed     = 3
              http_invalid_timeout       = 4
              OTHERS                     = 5.
    
          IF sy-subrc = 0.
            CALL METHOD lo_http_client->receive
              EXCEPTIONS
                http_communication_failure = 1
                http_invalid_state         = 2
                http_processing_failed     = 3
                OTHERS                     = 5.
          ENDIF.
    
          IF sy-subrc <> 0.
            "error handling
            response = lo_http_client->response->get_cdata( ).
            l_response = response.
          ELSE.
            response = lo_http_client->response->get_cdata( ).
            IF response IS NOT INITIAL.
              l_response = response.
            ELSE.
              l_response = 'Call was successful, but got no response'.
            ENDIF.
          ENDIF.
    
    WRITE l_response.


    Code Explanation

    Here, I have added variables l_question and l_max_tokens to hold the user’s question and the maximum token value, respectively. I have then added these values to the l_data variable, which is passed as the data parameter in the HTTP_POST call. The response variable l_response will hold the generated text as a result of the API call.

    Here, I have created an object of class if_http_client and added the headers using the add_header_field method. Then i have passed this object as a parameter ‘manager’ in the ‘HTTP_POST’ call.

    It’s important to note that the format of the data passed to the OpenAI API must be in JSON format, so that’s why I have added the prompt and max_tokens in JSON format in the l_data variable.

    Remember to replace <YOUR_API_KEY> with the API key that you have generated using the Open AI platform.

    Output Screen

    Chat GPT integration with SAP ABAP

    Tutorial Video

    You can watch the video below to learn implementation:

    [embedyt] https://www.youtube.com/watch?v=VvEO2MDpdAc[/embedyt]
  • Call Transaction Method in SAP BDC

    Introduction

    A Call transaction is a very simple report program. Once you execute and come out of the program, there is no log to cross check.

    Syntax:

    CALL TRANSACTION <transaction code> USING <it_bdcdata>
    MODE ‘A/E/N’
    UPDATE ‘A/S/L’
    MESSAGE INTO <it_msg_details>.

    Here, it_bdcdata represents the internal table that has instructions for one time execution of the t-code. This is the same table that we discussed in the section “SAP BDC Technical Details”. So, this internal table at one moment will hold instructions for only one record.

    Here, we have three different options for MODE. The modes determine the control over screen display.

    • A: It means, while execution of the program, all screens will be displayed. It is best suited for testing purpose as it is a foreground testing.
    • N: It means, while execution of the program, no screens will be shown even in case of success or error. This is best suited for production execution as it is a background job.
    • E: It means, the screens with message will be displayed every time there is an error. This is also used for testing purpose, in case SY-SUBRC fails for method N, and you are not able to identify the position of error.

    Here, we have three different options for UPDATE. The update command signifies Create, Update and delete operation over table/database. And, this UPDATE command provided the control over the sequence of database operations. Like, if data will be saved for all external file one by one, or in parallel.

    • A: It means Asynchronous. It means irrespective of the face that first set of data was processed and data was being saved in db, the next round of data process will start and not wait for the completion of first. This also means for large amount of data, the speed of the program will be faster in this mode. But, also there is a very rare chance of getting errors.
    • S: It means Synchronous. It means, every time the command CALL TRANSACTION is executed, until the data is saved in table and a success SY-SUBRC comes, it will not execute the CALL TRANSACTION for the next set of data. It is preferred in Production mode, as it is error free (Although slower).
    • L: It means Local. This is the command which signifies that the update for entire data (whole excel or csv or txt) will be executed at once, in the end, and only after the “COMMIT WORK” statement. The use case for Local Update or Update Function Module is where you either want all data to updated or none. The best use case is updating header and detail, and if detail or header fails, none of these tables will be updated. You can read more about it here.

    Here, it_msg_details saves all the messages that are produced over the screen (success, warning, information or error).

    Call Transaction Method Flow

    As you can see in the above design flow, the excel will be converted into internal table, and then BDC Codes (CALL TRANSACTION) will be called where <it_bdcdata> will be in form of BDCDATA format with various fields such as Program, DYNPRO, etc including field and value holding data of first row of the excel. Once the database process completes, the next data of the excel will be processed and so on.

    Steps to upload data in SAP system using BDC

    To understand the above process, we will show case a simple example where we will:

    1. Create multiple tables for Employee Data that can be created using a report.

    We have created these tables: zBarry_emp (for employee basic information), zBarry_sal (for employee Salary information) and zBarry_add (for employee address details). The fields are as shown below:

    zBarry_emp

    Field Name Field Type
    EMPID (Key) INT4
    FNAME CHAR20
    LNAME CHAR20
    PHONE CHAR20

    zBarry_sal

    Field Name Field Type
    EMPID (Key) INT4
    SALARY CHAR20

    zBarry_add

    Field Name Field Type
    EMPID (Key) INT4
    CITY CHAR20
    PIN CHAR20
    STATE CHAR20
    COUNTRY CHAR20

    2. The report will be able to take many fields as input.

    Now, we will create a report ZBARRYEMP_REPORT to take multiple inputs via screen and save them in the above tables. The code of the same is shown below:

    REPORT ZBARRYEMP_REPORT.
    Data: ls_emp type ZBARRY_EMP,
          ls_sal type zbarry_sal,
          ls_add type zbarry_add,
          lv_MSG type char20.
    
    PARAMETERS: p_empid TYPE int4,
    p_fname type char20,
    p_lname type char20,
    p_phone type char20,
    p_salary type char20,
    p_city type char20,
    p_pin type char20,
    p_state type char20,
    p_con type char20.
    
    " mapping for Employee Info
    ls_emp-empid = p_empid.
    ls_emp-fname = p_fname.
    ls_emp-lname = p_lname.
    ls_emp-phone = p_phone.
    
    
    " mapping for Employee Salary
    ls_sal-empid = p_empid.
    ls_sal-salary = p_salary.
    
    " mapping for Employee Address
    ls_add-empid = p_empid.
    ls_add-city = p_city.
    ls_add-pin = p_pin.
    ls_add-state = p_state.
    ls_add-country = p_con.
    
    " SQL Operations.
    INSERT ZBARRY_EMP FROM ls_emp.
    If Sy-subrc = 0.
    lv_MSG = 'Create is successful'.
    else.
      lv_MSG = 'Create Failed'.
           Endif.
    
     INSERT ZBARRY_sal FROM ls_sal.
    If Sy-subrc = 0.
    lv_MSG = 'Create is successful'.
    else.
      lv_MSG = 'Create Failed'.
           Endif.
    
      INSERT ZBARRY_add FROM ls_add.
    If Sy-subrc = 0.
    lv_MSG = 'Create is successful'.
    else.
      lv_MSG = 'Create Failed'.
           Endif.
    
           if lv_MSG EQ 'Create Failed'.
             MESSAGE lv_MSG TYPE 'E' DISPLAY LIKE 'E'.
               ENDIF.


    Output:

    ABAP Report for BDC

    3. Then, we will create a t-code for our report.

    We will create a T-code “ZMYTCODE” using SE93 for our report “ZBARRYEMP_REPORT”.

    Tcode for BDC

    Steps to Record a transaction code using BDC

    4. Thereafter, we will run a BDC recording (using T-Code SHDB) and get BDCDATA from that recorder.

    Step 1. Go to t-code SHDB and click on “New Recording”

    SHDB New Recording

    Step 2: Provide T-Code, any name for recording and set update mode as “Synchronous”.

    Create Recording SHDB

    Step 3: It will open your Report. Now, provide all the data, and press execute.

    BDC Recorder

    Now click, back to see your BDCDATA, for our example it looks like this:

    INDEX PROGRAM DYNPRO DYNBEGIN FNAM FVAL
    1 T ZMYTCODE
    2 ZBARRYEMP_REPORT 1000 X
    3 BDC_CURSOR P_CON
    4 BDC_OKCODE =ONLI
    5 P_EMPID 12
    6 P_FNAME Rudra
    7 P_LNAME Pandey
    8 P_PHONE 99999999
    9 P_SALARY INR 9999999
    10 P_CITY Mughalsarai
    11 P_PIN 232101
    12 P_STATE Uttar Pradesh
    13 P_CON India
    14 ZBARRYEMP_REPORT 1000 X
    15 BDC_OKCODE /EE
    16 BDC_CURSOR P_EMPID

    Now, here you can see that all our entered data is also recorded in the recording.

    Here BDC_OKCODE “=ONLI” is for our “Execute” button, and BDC_OKCODE = “/EE” is showcasing that we pressed back. We will use the code until we press execute.

    You can test your recording by clicking “Process” button:

    Test BDC

    While testing, do change data with a new set. Before exiting, you must save your recording.

    Steps to Create a BDC Program

    5. Now, we will create a program that accepts excel input and convert that excel into an internal table.

    Step 1: Create a new ABAP report “ZBARRYEMP_BDC” using t-code SE38.

    Step 2: Create the following:

    • local structure of type “bdcdata” where we will map our excel data with bdcdata that we recorded earlier
    • local internal table of type “bdcdata” where we will push our local structure that we have created above
    • local structure and internal table of type “bdcmsgcoll” where we will save the message for every call that we make to the recording
    • local internal table and local structure to hold excel data that we will upload

    We have created the following:

    REPORT ZBARRYEMP_BDC.
    " local structure with combined fields of emp table, salary table and address table
    TYPES: BEGIN OF ls_emp,
      empid type INT4,
      fname type char20,
      lname type char20,
      phone type char20,
      salary type char20,
      city type char20,
      pin type char20,
      state type char20,
      country type char20,
      END OF ls_emp.
    
    DATA: ls_bdcdata TYPE bdcdata,
          ls_msg type bdcmsgcoll.
    
    DATA: lt_bdcdata TYPE TABLE OF bdcdata,
          lt_bdcmsg TYPE TABLE OF bdcmsgcoll,
          lt_bankdata TYPE TABLE OF ls_emp.


    Step 3: Now, we will import the excel data using Function Module ‘TEXT_CONVERT_XLS_TO_SAP’ and push it to our internal table it_empdata. You can read more about Excel upload in ABAP here.

    " Uploading Excel and converting it into Interna Table
    TYPE-POOLS truxs.
    PARAMETERS p_file TYPE rlgrap-filename.
    
    DATA : t_upload  TYPE STANDARD TABLE OF ls_emp,
           wa_upload TYPE ls_emp,
           it_type   TYPE truxs_t_text_data.
    
    AT SELECTION-SCREEN ON VALUE-REQUEST FOR p_file.
      CALL FUNCTION 'F4_FILENAME'
        EXPORTING
          field_name = 'p_file'
        IMPORTING
          file_name  = p_file.
    
    START-OF-SELECTION.
      CALL FUNCTION 'TEXT_CONVERT_XLS_TO_SAP'
        EXPORTING
          i_tab_raw_data       = it_type
          i_filename           = p_file
        TABLES
          i_tab_converted_data = t_upload[]
        EXCEPTIONS
          conversion_failed    = 1
          OTHERS               = 2.
      IF sy-subrc <> 0.
        MESSAGE ID sy-msgid TYPE sy-msgty NUMBER sy-msgno
                WITH sy-msgv1 sy-msgv2 .
      ENDIF.
    
    END-OF-SELECTION.


    Step 4: Now in a loop we will keep pushing the bdcdata parameters that is

    • PROGRAM, DYNPRO, DYNBEGIN: These will remain constant for one screen (in our case, constant for whole program as we have only one screen). These will be taken from the BDCDATA that we have generated i.e.
    ZBARRYEMP_REPORT 1000 X
    • FNAM, FVAL: These will hold the key and values (In our case, the keys are the parameters that we used for input in our ABAP report “ZBARRYEMP_REPORT” while the values will be taken from excel upload.
    • The first two fields for a screen are always BDC_CURSOR  and BDC_OKCODE.  The value can be retrieved from the generated BDCDATA. In this case, the values are ‘P_CON ‘ and ‘=ONLI’, respectively.


    Step 5: Once the values are taken as per BDCDATA structure, we call the “CALL TRANSACTION” statement. These entire statements will be looped until the operation finishes for the entire excel data.

    The syntax for CALL TRANSACTION is:

    CALL TRANSACTION <transaction code> USING <it_bdcdata>
    MODE ‘A/E/N’
    UPDATE ‘A/S/L’
    MESSAGES INTO <it_msg_details>.


    For our example, the above value will become:

    CALL TRANSACTION ‘ZMYTCODE’ USING lt_bdcdata
    MODE ‘N’
    UPDATE ‘S
    MESSAGES INTO lt_bdcmsg.


    Step 6: Now upload an excel file with the given format. In our example, we have an excel as shown below:

    Excel format BDC

    Note: Do not include the header. The excel should look like this:

    Excel with Data for BDC

    Once you are done with the ABAP Changes, then run the report, upload the excel file and once the ABAP Report executes, check the table to see if all the records are uploaded or not.

    ABAP Code for BDC Program

    REPORT ZBARRYEMP_BDC.
    " local structure with combined fields of emp table, salary table and address table
    TYPES: BEGIN OF ls_emp,
      empid type int2,
      fname type char20,
      lname type char20,
      phone type char20,
      salary type char20,
      city type char20,
      pin type char20,
      state type char20,
      country type char20,
      END OF ls_emp.
    
    DATA: ls_bdcdata TYPE bdcdata,
          ls_msg type bdcmsgcoll.
    
    DATA: lt_bdcdata TYPE TABLE OF bdcdata,
          lt_bdcmsg TYPE TABLE OF bdcmsgcoll,
          lt_empdata TYPE TABLE OF ls_emp.
    
    " Uploading Excel and converting it into Interna Table
    TYPE-POOLS truxs.
    PARAMETERS p_file TYPE rlgrap-filename.
    
    DATA : t_upload  TYPE STANDARD TABLE OF ls_emp,
           wa_upload TYPE ls_emp,
           it_type   TYPE truxs_t_text_data.
    
    AT SELECTION-SCREEN ON VALUE-REQUEST FOR p_file.
      CALL FUNCTION 'F4_FILENAME'
        EXPORTING
          field_name = 'p_file'
        IMPORTING
          file_name  = p_file.
    
    START-OF-SELECTION.
      CALL FUNCTION 'TEXT_CONVERT_XLS_TO_SAP'
        EXPORTING
          i_tab_raw_data       = it_type
          i_filename           = p_file
        TABLES
          i_tab_converted_data = t_upload[]
        EXCEPTIONS
          conversion_failed    = 1
          OTHERS               = 2.
      IF sy-subrc <> 0.
        MESSAGE ID sy-msgid TYPE sy-msgty NUMBER sy-msgno
                WITH sy-msgv1 sy-msgv2 .
      ENDIF.
    
      " Loop the above table t_upload[] data until all data is uploaded via BDC
      LOOP AT t_upload into wa_upload.
    * Screen 1 - Field 1 is always BDC_CURSOR
    ls_bdcdata-PROGRAM = 'ZBARRYEMP_REPORT'.
    ls_bdcdata-DYNPRO = '1000'.
    ls_bdcdata-DYNBEGIN = 'X'.
    ls_bdcdata-fnam = 'BDC_CURSOR'.
    ls_bdcdata-fval = 'P_CON'.
    APPEND ls_bdcdata to lt_bdcdata.
    CLEAR ls_bdcdata.
    
    * Screen 1 - Field 2 - Always BDC_OKCODE
    ls_bdcdata-fnam = 'BDC_OKCODE'.
    ls_bdcdata-fval = '=ONLI'.
    APPEND ls_bdcdata to lt_bdcdata.
    CLEAR ls_bdcdata.
    
    * Screen 1 - Field 3
    ls_bdcdata-fnam = 'P_EMPID'.
    ls_bdcdata-fval = wa_upload-empid.
    APPEND ls_bdcdata to lt_bdcdata.
    CLEAR ls_bdcdata.
    
    * Screen 1 - Field 4
    ls_bdcdata-fnam = 'P_FNAME'.
    ls_bdcdata-fval = wa_upload-fname.
    APPEND ls_bdcdata to lt_bdcdata.
    CLEAR ls_bdcdata.
    
    * Screen 1 - Field 5
    ls_bdcdata-fnam = 'P_LNAME'.
    ls_bdcdata-fval = wa_upload-lname.
    APPEND ls_bdcdata to lt_bdcdata.
    CLEAR ls_bdcdata.
    
    * Screen 1 - Field 6
    ls_bdcdata-fnam = 'P_PHONE'.
    ls_bdcdata-fval = wa_upload-phone.
    APPEND ls_bdcdata to lt_bdcdata.
    CLEAR ls_bdcdata.
    
    * Screen 1 - Field 7
    ls_bdcdata-fnam = 'P_SALARY'.
    ls_bdcdata-fval = wa_upload-salary.
    APPEND ls_bdcdata to lt_bdcdata.
    CLEAR ls_bdcdata.
    
    * Screen 1 - Field 8
    ls_bdcdata-fnam = 'P_CITY'.
    ls_bdcdata-fval = wa_upload-city.
    APPEND ls_bdcdata to lt_bdcdata.
    CLEAR ls_bdcdata.
    
    * Screen 1 - Field 9
    ls_bdcdata-fnam = 'P_PIN'.
    ls_bdcdata-fval = wa_upload-pin.
    APPEND ls_bdcdata to lt_bdcdata.
    CLEAR ls_bdcdata.
    
    * Screen 1 - Field 10
    ls_bdcdata-fnam = 'P_STATE'.
    ls_bdcdata-fval = '=ONLI'.
    APPEND ls_bdcdata to lt_bdcdata.
    CLEAR ls_bdcdata.
    
    * Screen 1 - Field 10
    ls_bdcdata-fnam = 'P_CON'.
    ls_bdcdata-fval = wa_upload-country.
    APPEND ls_bdcdata to lt_bdcdata.
    CLEAR ls_bdcdata.
    ENDLOOP.
    
    "Call BDC Transaction
    CALL TRANSACTION 'ZMYTCODE' USING lt_bdcdata MODE 'A' UPDATE 'S' MESSAGES INTO lt_bdcmsg.
    CLEAR lt_bdcdata.
    
    END-OF-SELECTION.


    Output

    BDC Program Output