Preface – This post is part of the SAP ABAP RAP series.
Introduction
SAP RAP stands for Restful Application Programming. It is the newest framework by SAP to develop projects using ABAP and S/4HANA. In this project, we will learn simple steps to learn how to create a program on SAP ABAP RAP CRUD Operation in S/4HANA Cloud [Managed].
Types of Projects using SAP RAP
- S/4HANA On Premise [Managed]
- S/4HANA Cloud [Managed]
- S/4HANA On Premise [Managed with Save]
- S/4HANA Cloud [Managed with Save]
- S/4HANA On Premise [Unmanaged]
- S/4HANA Cloud [Unmanaged]
ABAP RAP Configuration Flow

ABAP RAP Data Flow

Project Structure
Here is what we will do
- Create ABAP Table
- Create CDS Views
- Add Metadata
- Create Behaviour Definition
- Create Service Definition
- Create Service Binding
- Test the RAP Fiori Application

Steps to Follow
1. Create a Z table => Populate Table
2. On top of the table, create an Interface CDS View => Metadata Extension
3. On top of your basic or Interface CDS view, create a root view (Consumption View)
4. On top of the CDS view, create Behaviour Definition
5. On top of the Consumption CDS view, create a Service Definition
6. On top of Service Definition, we add Service Binding
7. Activate and Click Publish
Code
1. Table
@EndUserText.label : 'Employee Data'
@AbapCatalog.enhancement.category : #NOT_EXTENSIBLE
@AbapCatalog.tableCategory : #TRANSPARENT
@AbapCatalog.deliveryClass : #A
@AbapCatalog.dataMaintenance : #RESTRICTED
define table zemp_data {

  key client : abap.clnt not null;
  key empid  : abap.int4 not null;
  fname      : abap.sstring(20);
  lname      : abap.sstring(20);
  phone      : abap.sstring(20);

}
Program to Upload data via Class:
CLASS zemp_data_rudra DEFINITION
  PUBLIC
  FINAL
  CREATE PUBLIC .
  PUBLIC SECTION.
  Interfaces if_oo_adt_classrun.
METHODS
 UPLOAD_EMP_DATA.
  PROTECTED SECTION.
  PRIVATE SECTION.
ENDCLASS.


CLASS zemp_data_rudra IMPLEMENTATION.
METHOD : UPLOAD_EMP_DATA.
Data: lt_type_emp TYPE STANDARD TABLE OF Zemp_data.
      lt_type_emp = Value #( ( empid = 1
     fname = 'Rudra'
     lname = 'Pandey'
     phone = '999999')
     ( empid = 2
     fname = 'Deepak'
     lname = 'Ram'
     phone = '888888')
     ).

INSERT Zemp_data from TABLE @lt_type_emp.
ENDMETHOD.
METHOD if_oo_adt_classrun~main.
UPLOAD_EMP_DATA( ).
ENDMETHOD.


ENDCLASS.
2. Interface CDS View
@AbapCatalog.sqlViewName: 'ZV_EMPDATA'
@AbapCatalog.compiler.compareFilter: true
@AbapCatalog.preserveKey: true
@AccessControl.authorizationCheck: #NOT_REQUIRED
@EndUserText.label: 'Interface View'
define root view Z_I_EMP_DATA as select from zemp_data {
    key empid,
    fname,
    lname,
    phone
}
3. Metadata Extension
@Metadata.layer: #CORE
@UI: {
headerInfo: {
typeName: 'Employee Data',
title: { type: #STANDARD, label: 'Employee Data', value: 'empid'}
}
}
annotate view Z_C_EMP_DATA
    with
{
@UI.facet: [{ id: 'EmpView',
purpose: #STANDARD,
type: #IDENTIFICATION_REFERENCE,
label: 'Employee Data',
position: 10 }]

@UI: { lineItem:[{
position: 10,
importance: #HIGH,
label:'Employee ID'}],
identification: [{ position: 10}],
selectionField: [{ position: 10}]
}
  Empid;


  @UI: { lineItem:[{
position: 20,
importance: #HIGH,
label:'First Name'}],
identification: [{ position: 20}],
selectionField: [{ position: 20}]
  }
  Fname;

@UI: { lineItem:[{
position: 30,
importance: #HIGH,
label:'Last Name'}],
identification: [{ position: 30}],
selectionField: [{ position: 30}]
  }
  Lname;

  @UI: { lineItem:[{
position: 40,
importance: #HIGH,
label:'Phone Number'}],
identification: [{ position: 40}],
selectionField: [{ position: 40}]
  }

  Phone;

}
4. Consumption View
@AccessControl.authorizationCheck: #NOT_REQUIRED
@EndUserText.label: 'Root View for Employee Data'
@Search.searchable: true
@Metadata.allowExtensions: true
define root view entity Z_C_EMP_DATA provider contract transactional_query
 as projection on Z_I_EMP_DATA as EmpView
{   @EndUserText.label: 'ID'
    key empid as Empid,
     @EndUserText.label: 'First Name'
     @Search.defaultSearchElement: true
    fname as Fname,
     @EndUserText.label: 'Last Name'
    lname as Lname,
     @EndUserText.label: 'Phone Number'
    phone as Phone
}
5. Behaviour Definition on Interface CDS View
managed;// implementation in class zbp_i_emp_data unique;
//strict ( 2 ); //Uncomment this line in order to enable strict mode 2. The strict mode has two variants (strict(1), strict(2)) and is prerequisite to be future proof regarding syntax and to be able to release your BO.

define behavior for Z_I_EMP_DATA  alias EmpView
implementation in class zbp_i_emp_data unique
persistent table ZEMP_DATA
lock master
//authorization master ( instance )
//etag master <field_name>
{

field(mandatory) empid, fname, lname, phone;
create;
update;
delete;
//static function DefaultForCreate result [1] $self;

mapping for Zemp_data
{
empid = empid;
fname = fname;
lname = lname;
phone = phone;
}
}
6. Behaviour Definition on Consumption CDS View
projection;
//strict ( 2 ); //Uncomment this line in order to enable strict mode 2. The strict mode has two variants (strict(1), strict(2)) and is prerequisite to be future proof regarding syntax and to be able to release your BO.

define behavior for Z_C_EMP_DATA alias EmpView
use etag
{
  use create;
  use update;
  use delete;
}
7. Service Definition
@EndUserText.label: 'Service Definition for Employee Data'
define service ZEMP_SRV {
  expose Z_C_EMP_DATA;
}
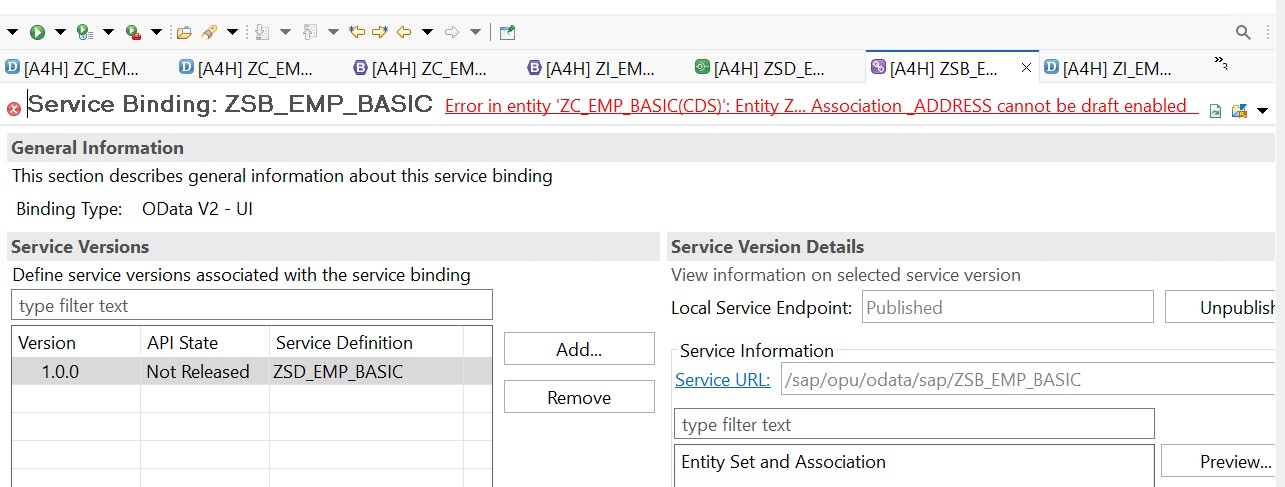
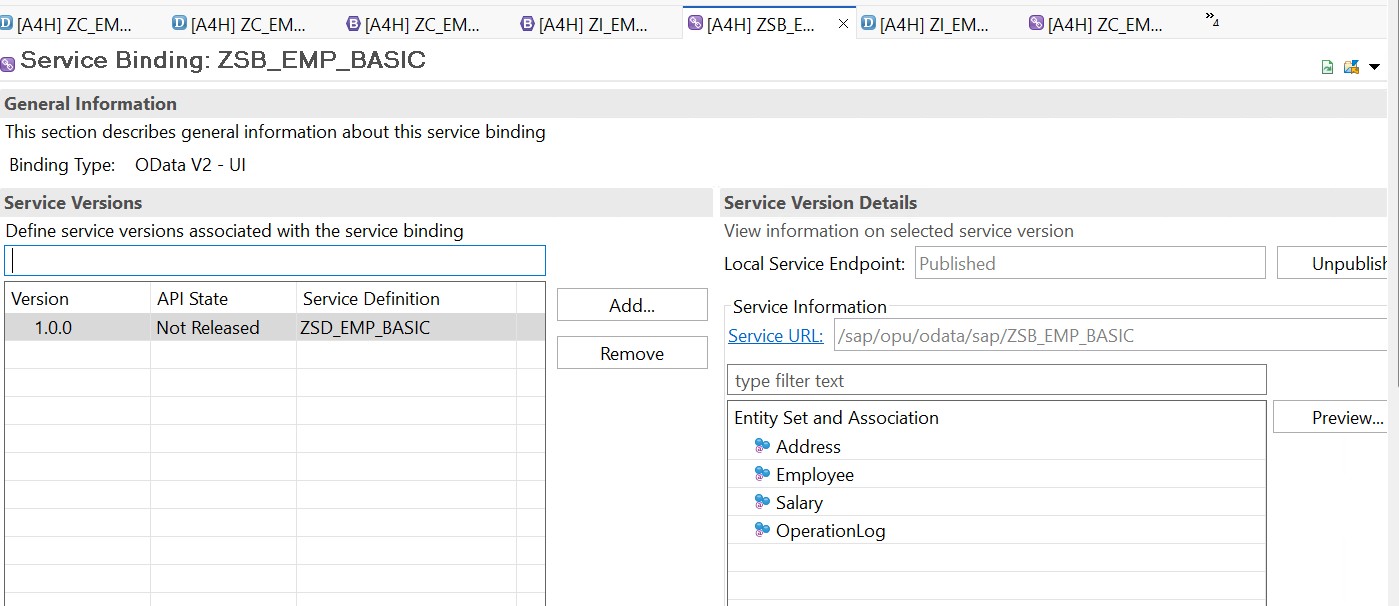
8. Service Binding

9. Fiori Application
A. List Page

B. Object Page

Tutorial Video
You can watch the video below to learn implementation:
[embedyt] https://www.youtube.com/watch?v=oAphoD3o90s[/embedyt]